
Color Drenching
Transform Your Space with Color Drenching
If you love bold, statement-making interiors, color drenching might just be your new favorite design trick! This trend is all about embracing a single hue and using it across walls, ceilings, trim, and even furniture for a rich, immersive effect. Whether you want to create a cozy, moody vibe or a bright, energetic space, color drenching is an easy way to make a big impact. Let’s dive in!


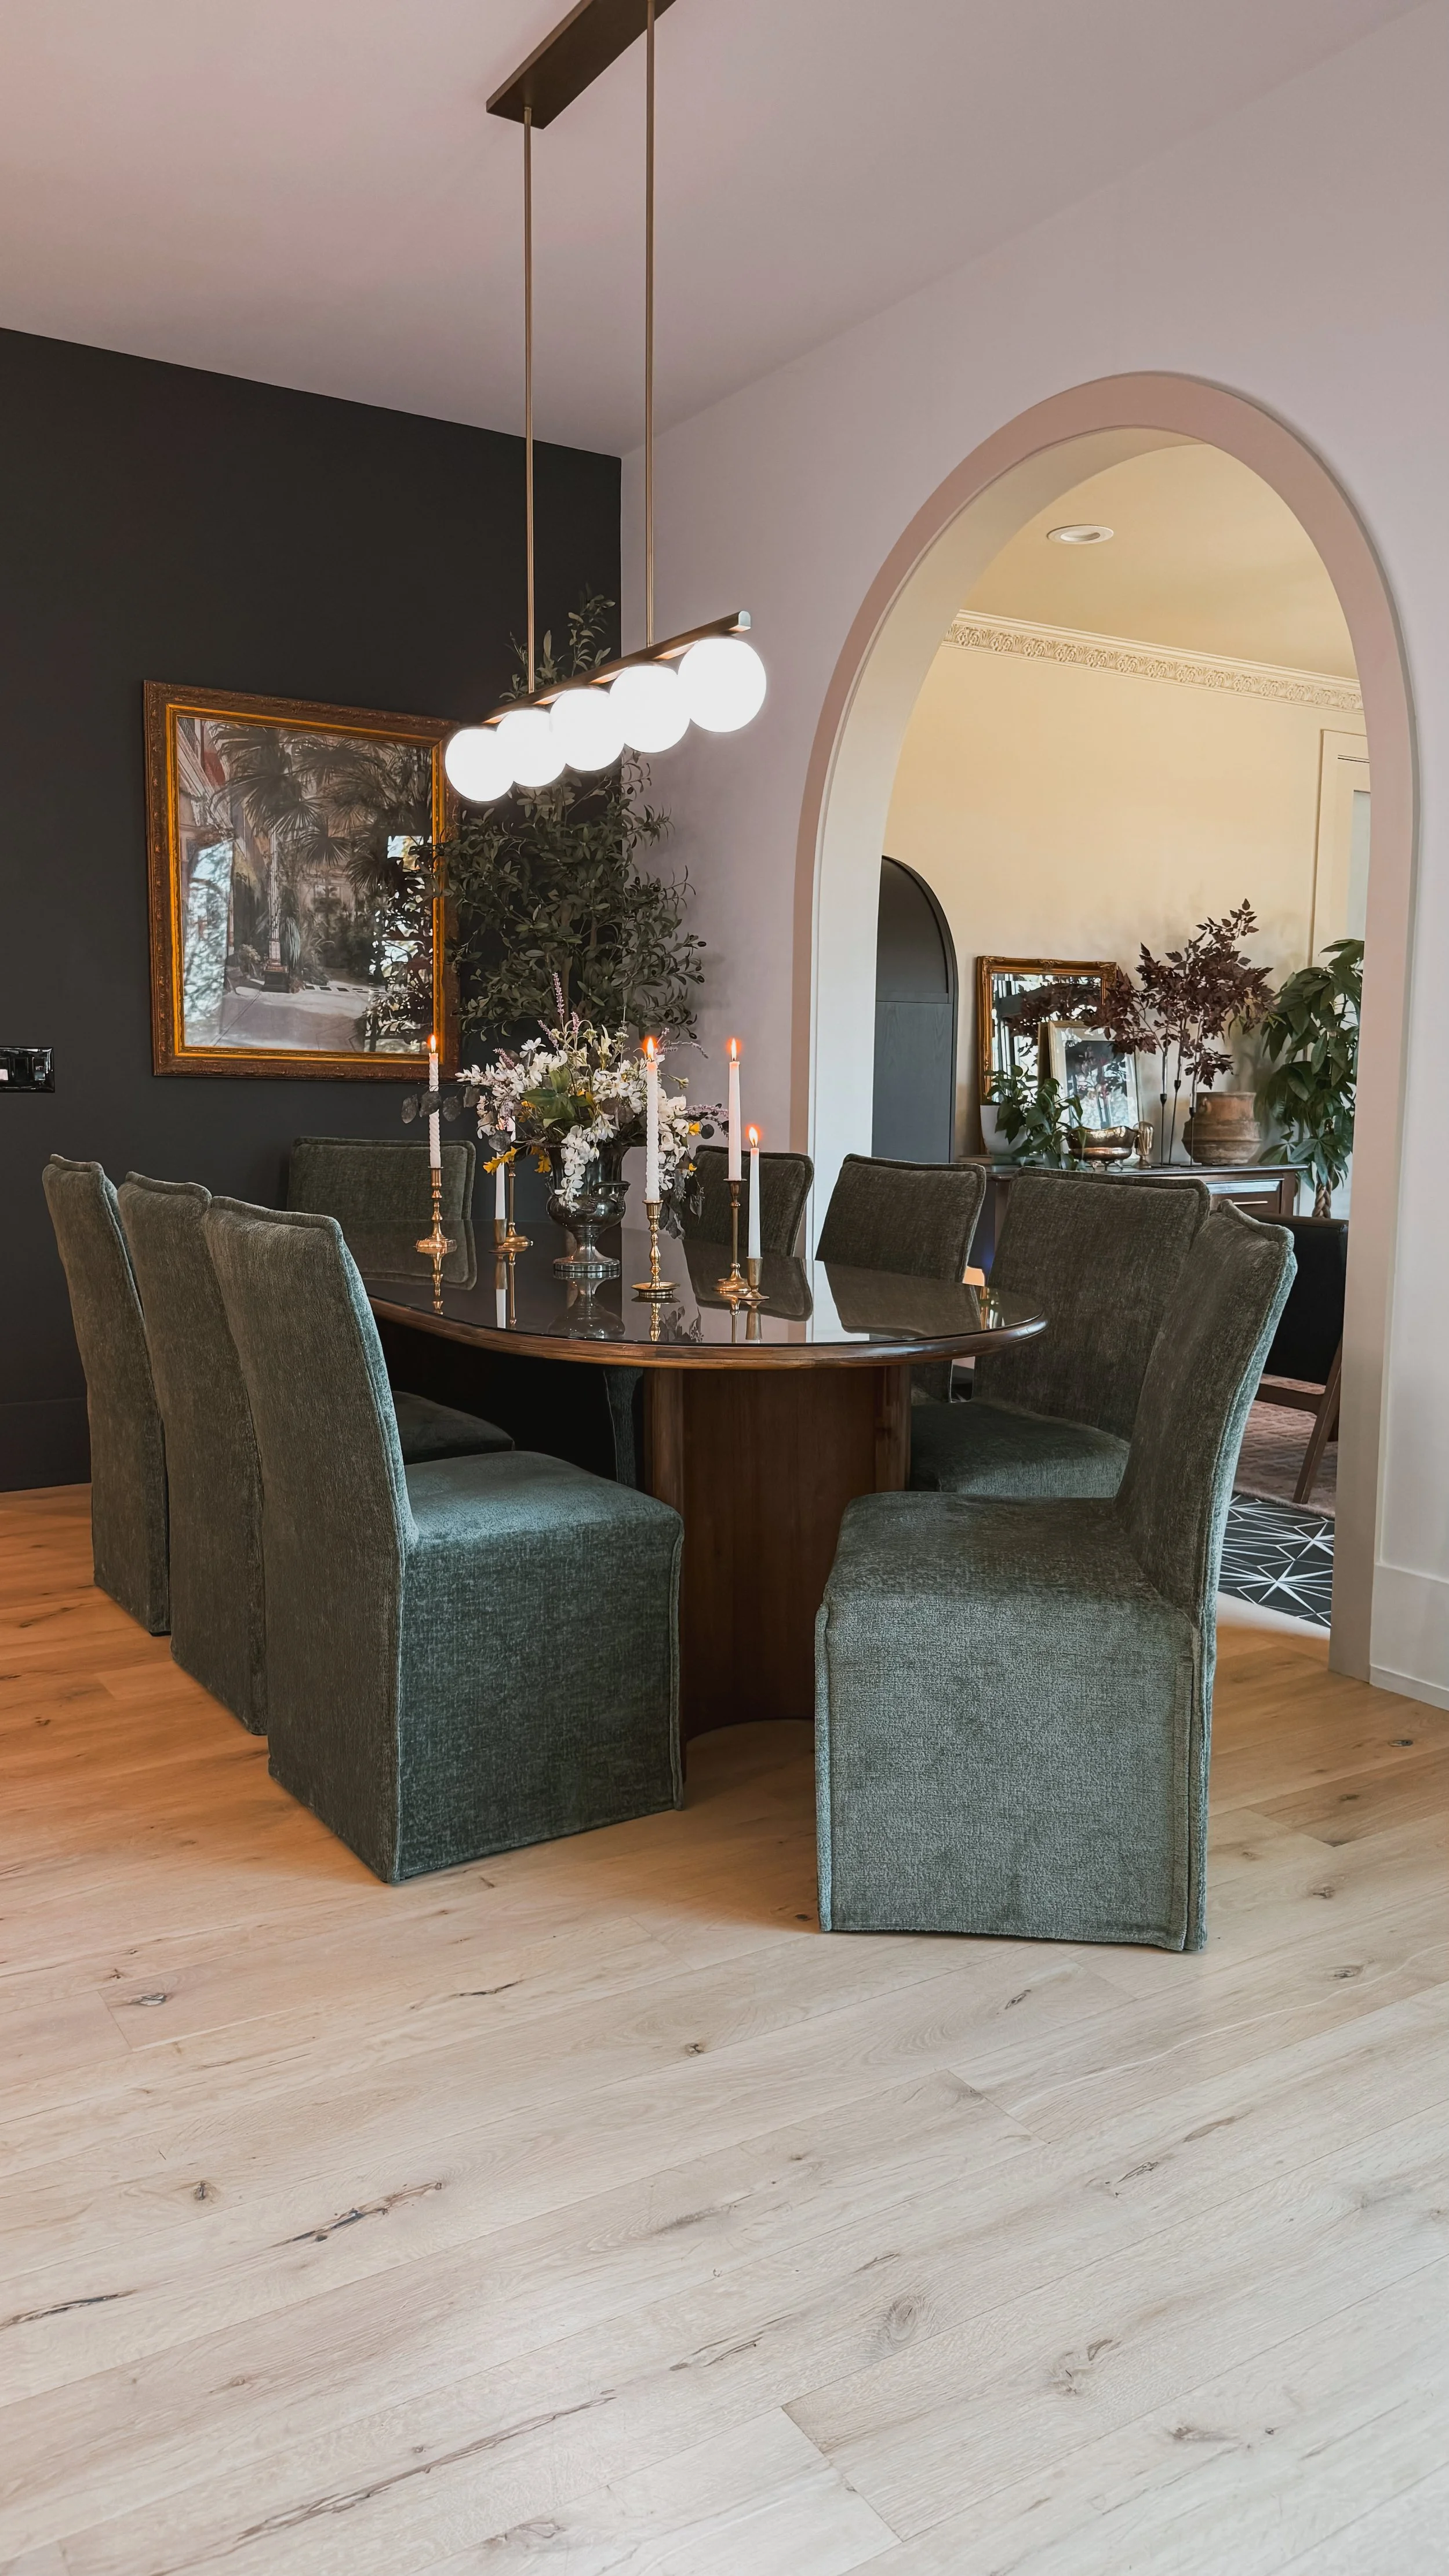
Moody Elegance: Color Drenching in the Primary Bedroom
This stunning room is a perfect example of the power of color drenching. Painted in Field Trip by Clare, the deep olive green envelops the walls, ceiling, trim, and even doors in an ultra-cohesive and immersive atmosphere. The single-hue approach enhances the room’s architectural details, making the intricate molding and paneling stand out in a sophisticated way. The eggshell sheen adds a subtle warmth and soft texture that elevates the space.
This space proves that color drenching isn’t just about painting everything the same shade—it’s about layering textures, finishes, and complementary tones to create a truly stunning effect!
If there's something in this room that catches your eye and you'd like the link, just click here!


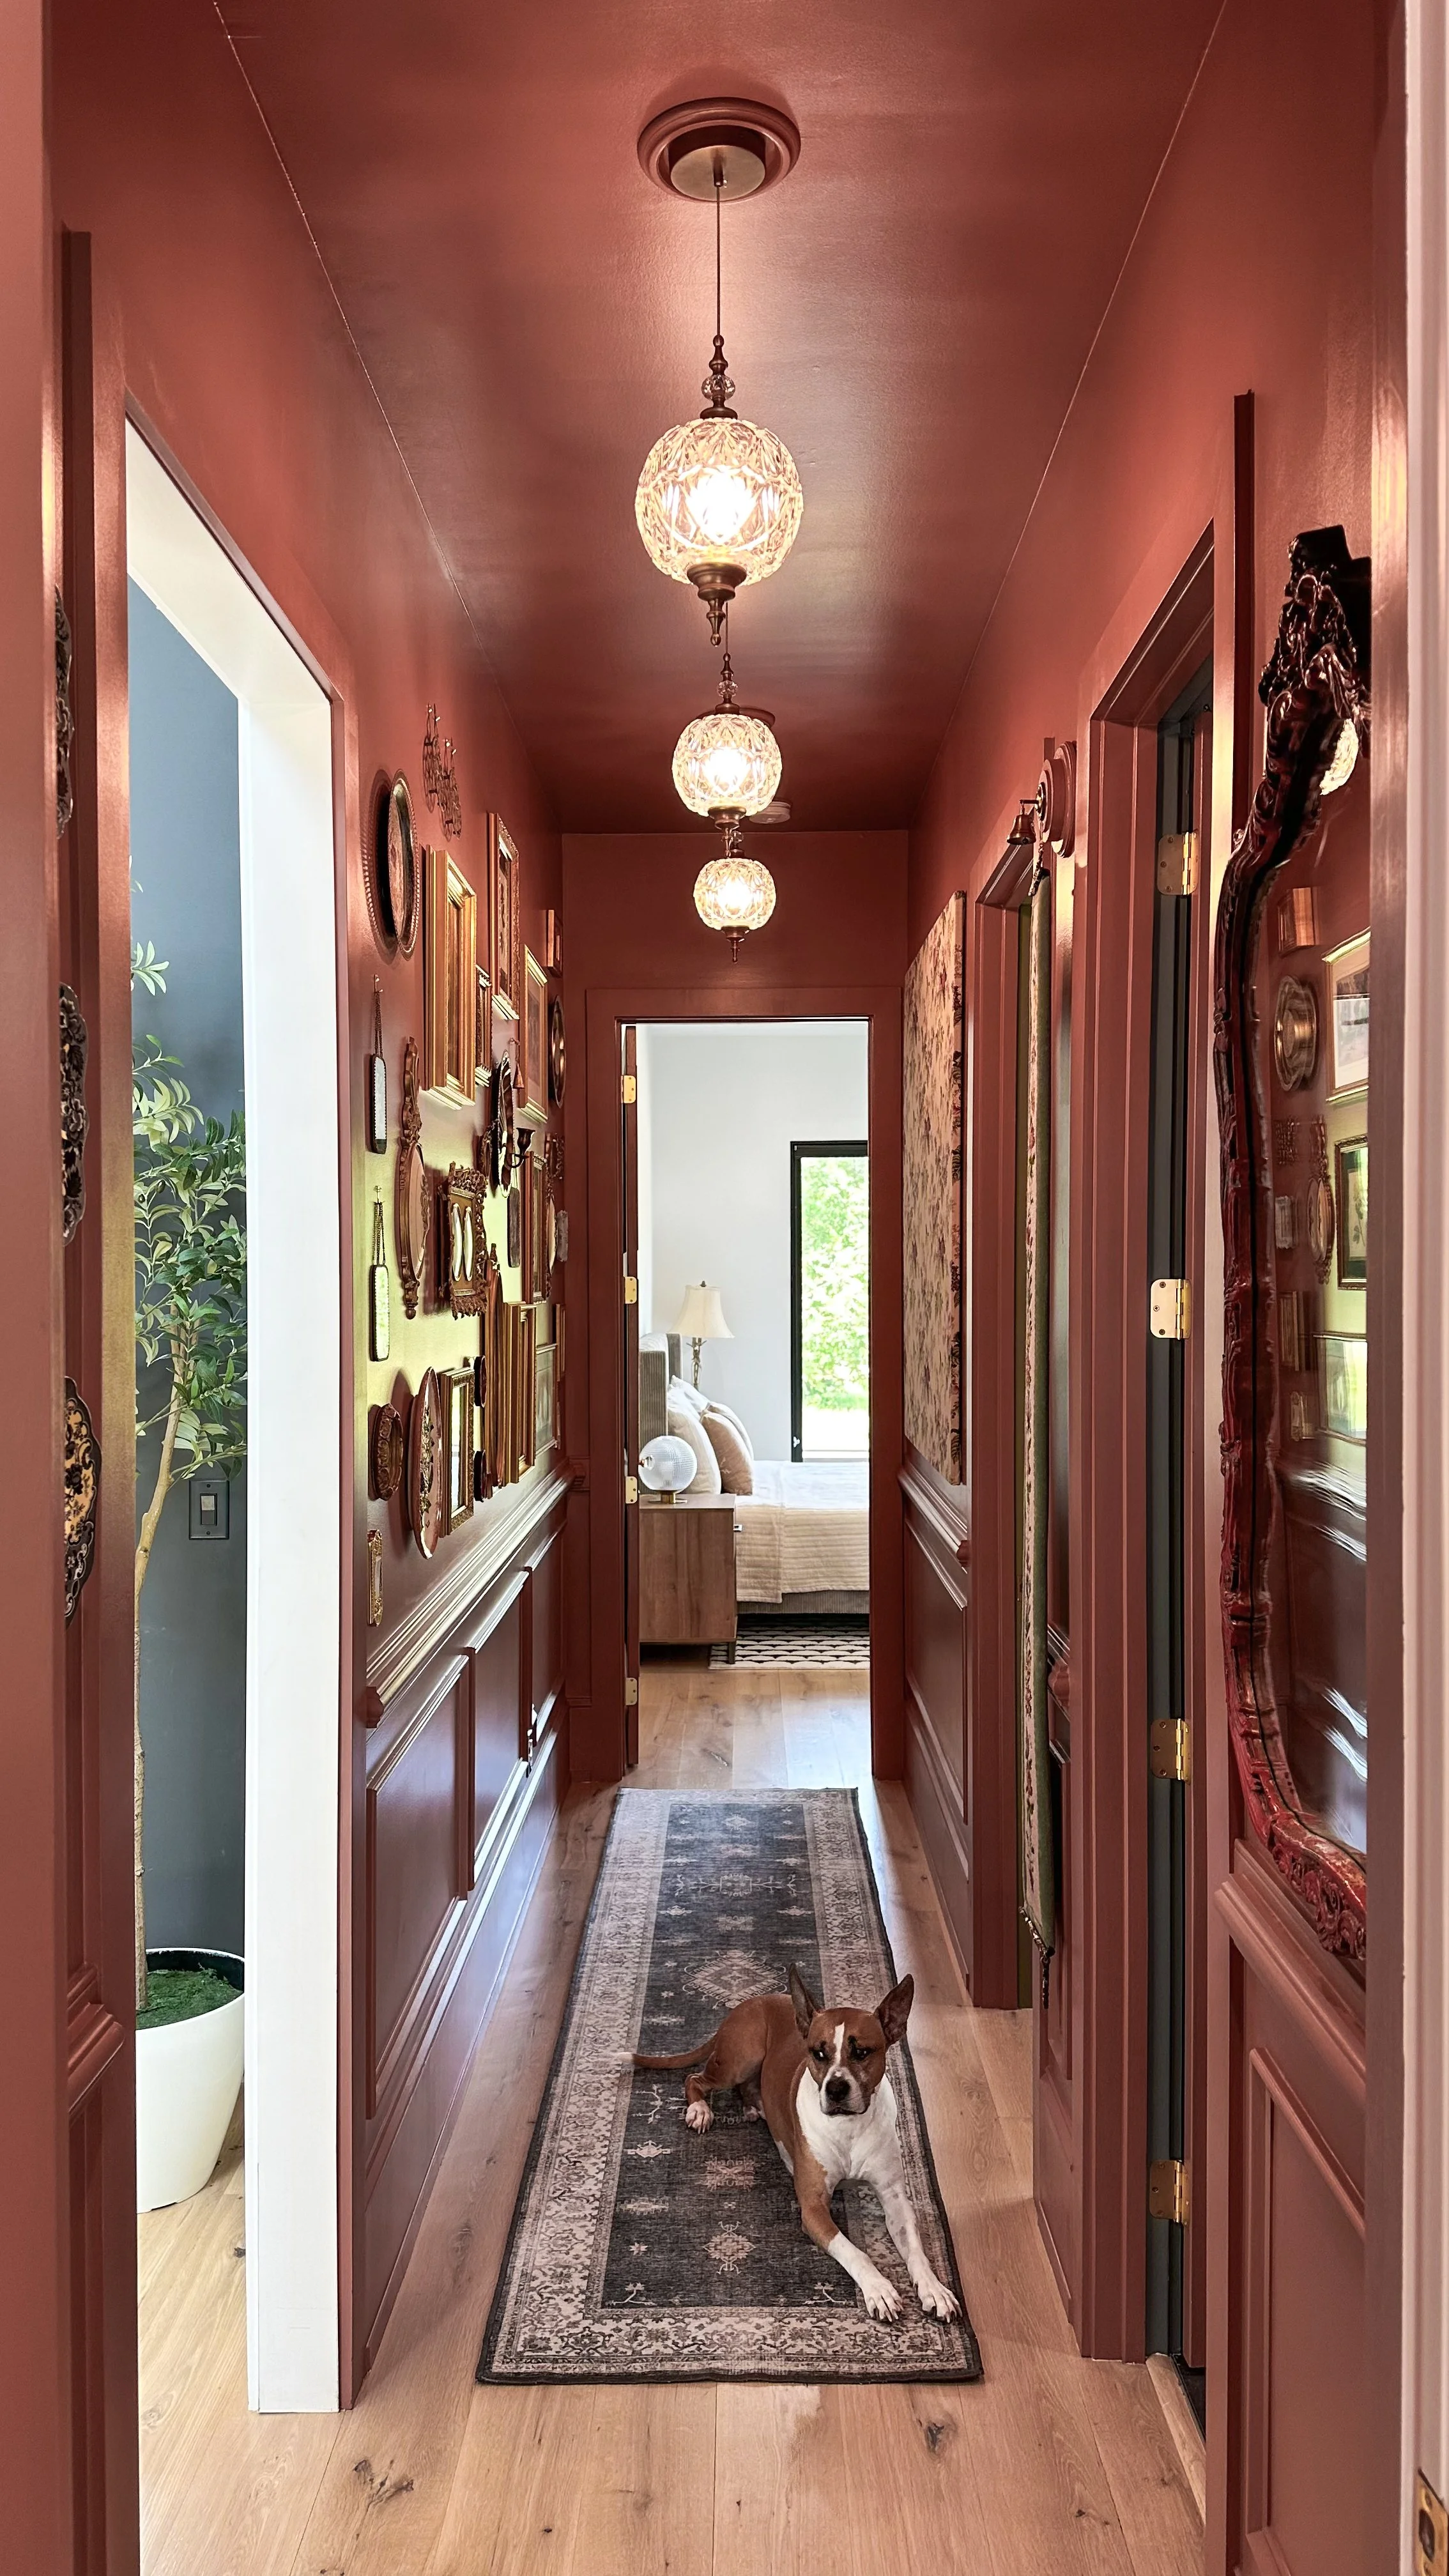
A Bold and Inviting Hallway with Color Drenching
Hallways are often overlooked in design, but this space shows how a rich, saturated color can elevate even the most transitional areas into something special. Painted in Reddened Earth by HGTV Home by Sherwin-Williams, the warm, earthy tone envelops the walls, trim, and ceiling in a cozy yet dramatic embrace. This terracotta-inspired hue adds depth and warmth, creating a welcoming atmosphere as you move through the space.
Color drenching here brings out the architectural details, allowing the moldings and doorways to flow seamlessly into the design, avoiding any interruptions to the visual flow. The warm undertones complement the natural wood elements and soft lighting, enhancing the intimacy and stylish vibe of the space. The walls and ceiling are finished in satin sheen, while the doors have a semi-gloss finish. If I had to do it again, I would opt for satin on the doors as well—the semi-gloss feels a bit too glossy for my taste.
This hallway proves that even the smallest spaces can make a big impact with the right color and finish choices!
If there's something in this room that catches your eye and you'd like the link, just click here!


Soft & Serene: A Dreamy Bedroom with 50% Malted Milk
For a cozy yet elevated feel, this 50% Malted Milk by Sherwin-Williams color-drenched bedroom is the perfect balance of warmth and softness. By using a lighter, custom-mixed version of this creamy beige, the space feels airy and inviting while still offering a rich, enveloping effect. The walls, ceiling, and trim all blend seamlessly, creating a soothing and cohesive environment—perfect for a restful retreat.
The eggshell sheen adds just the right amount of softness while reflecting a touch of light, keeping the space feeling warm and welcoming. Looking back, I would opt for 100% Malted Milk instead for a bit more depth and richness, but this toned-down version still creates a beautiful and serene atmosphere.
Color drenching in this subtle, warm tone proves that neutrals can be just as impactful as bold colors, bringing depth and character while maintaining a timeless, calming aesthetic.
If there's something in this room that catches your eye and you'd like the link, just click here!


Fiery & Bold: A Red Bathroom
For a bathroom with impact, Salute by Sherwin-Williams is the perfect deep red hue. Its rich, warm tone envelops the space, creating a bold yet inviting atmosphere. Paired with crisp white trim, the contrast highlights the red's intensity without feeling overwhelming.
The eggshell sheen offers a soft luster, reflecting light while maintaining the color's depth and drama. This striking shade pairs beautifully with gold hardware and dark wood, creating a dynamic yet cozy retreat. Salute proves that bold colors can add warmth and character, transforming a bathroom into a memorable space.
If there's something in this room that catches your eye and you'd like the link, just click here!


Bright & Airy: A Sunroom Drenched in Light
For a sunroom that celebrates natural light, Maison Blanche by HGTV Home by Sherwin-Williams is the perfect soft, creamy white. The hue captures the sunlight streaming through the windows, enhancing the space with a fresh, open feel. Color drenching the walls, ceiling, and trim creates a seamless, airy environment that feels expansive and peaceful.
The satin sheen adds a subtle glow, reflecting light while maintaining a smooth, sophisticated finish. The warm undertones of Maison Blanche complement the abundance of natural light, making the room feel both bright and inviting. This soft white pairs effortlessly with light wood furniture and vibrant greenery, transforming the sunroom into a serene retreat that feels connected to the outdoors.
If there's something in this room that catches your eye and you'd like the link, just click here!


A Playroom Full of Color & Fun
For a lively and cheerful playroom, Pressed Flower by Sherwin-Williams brings the perfect pop of color. This soft, yet vibrant hue adds warmth and energy to the space, creating an environment where creativity can flourish. Drenching the walls in this joyful tone envelops the room in a welcoming, playful atmosphere.
The flat finish provides a smooth, understated look, but I recommend opting for eggshell for a bit more durability and a subtle sheen that’s easier to clean. Pressed Flower pairs beautifully with colorful toys, playful patterns, and cozy textures, making it a space where fun and imagination can run wild. It’s the perfect backdrop for a room that will grow with your child, offering both whimsy and warmth.
If there's something in this room that catches your eye and you'd like the link, just click here!

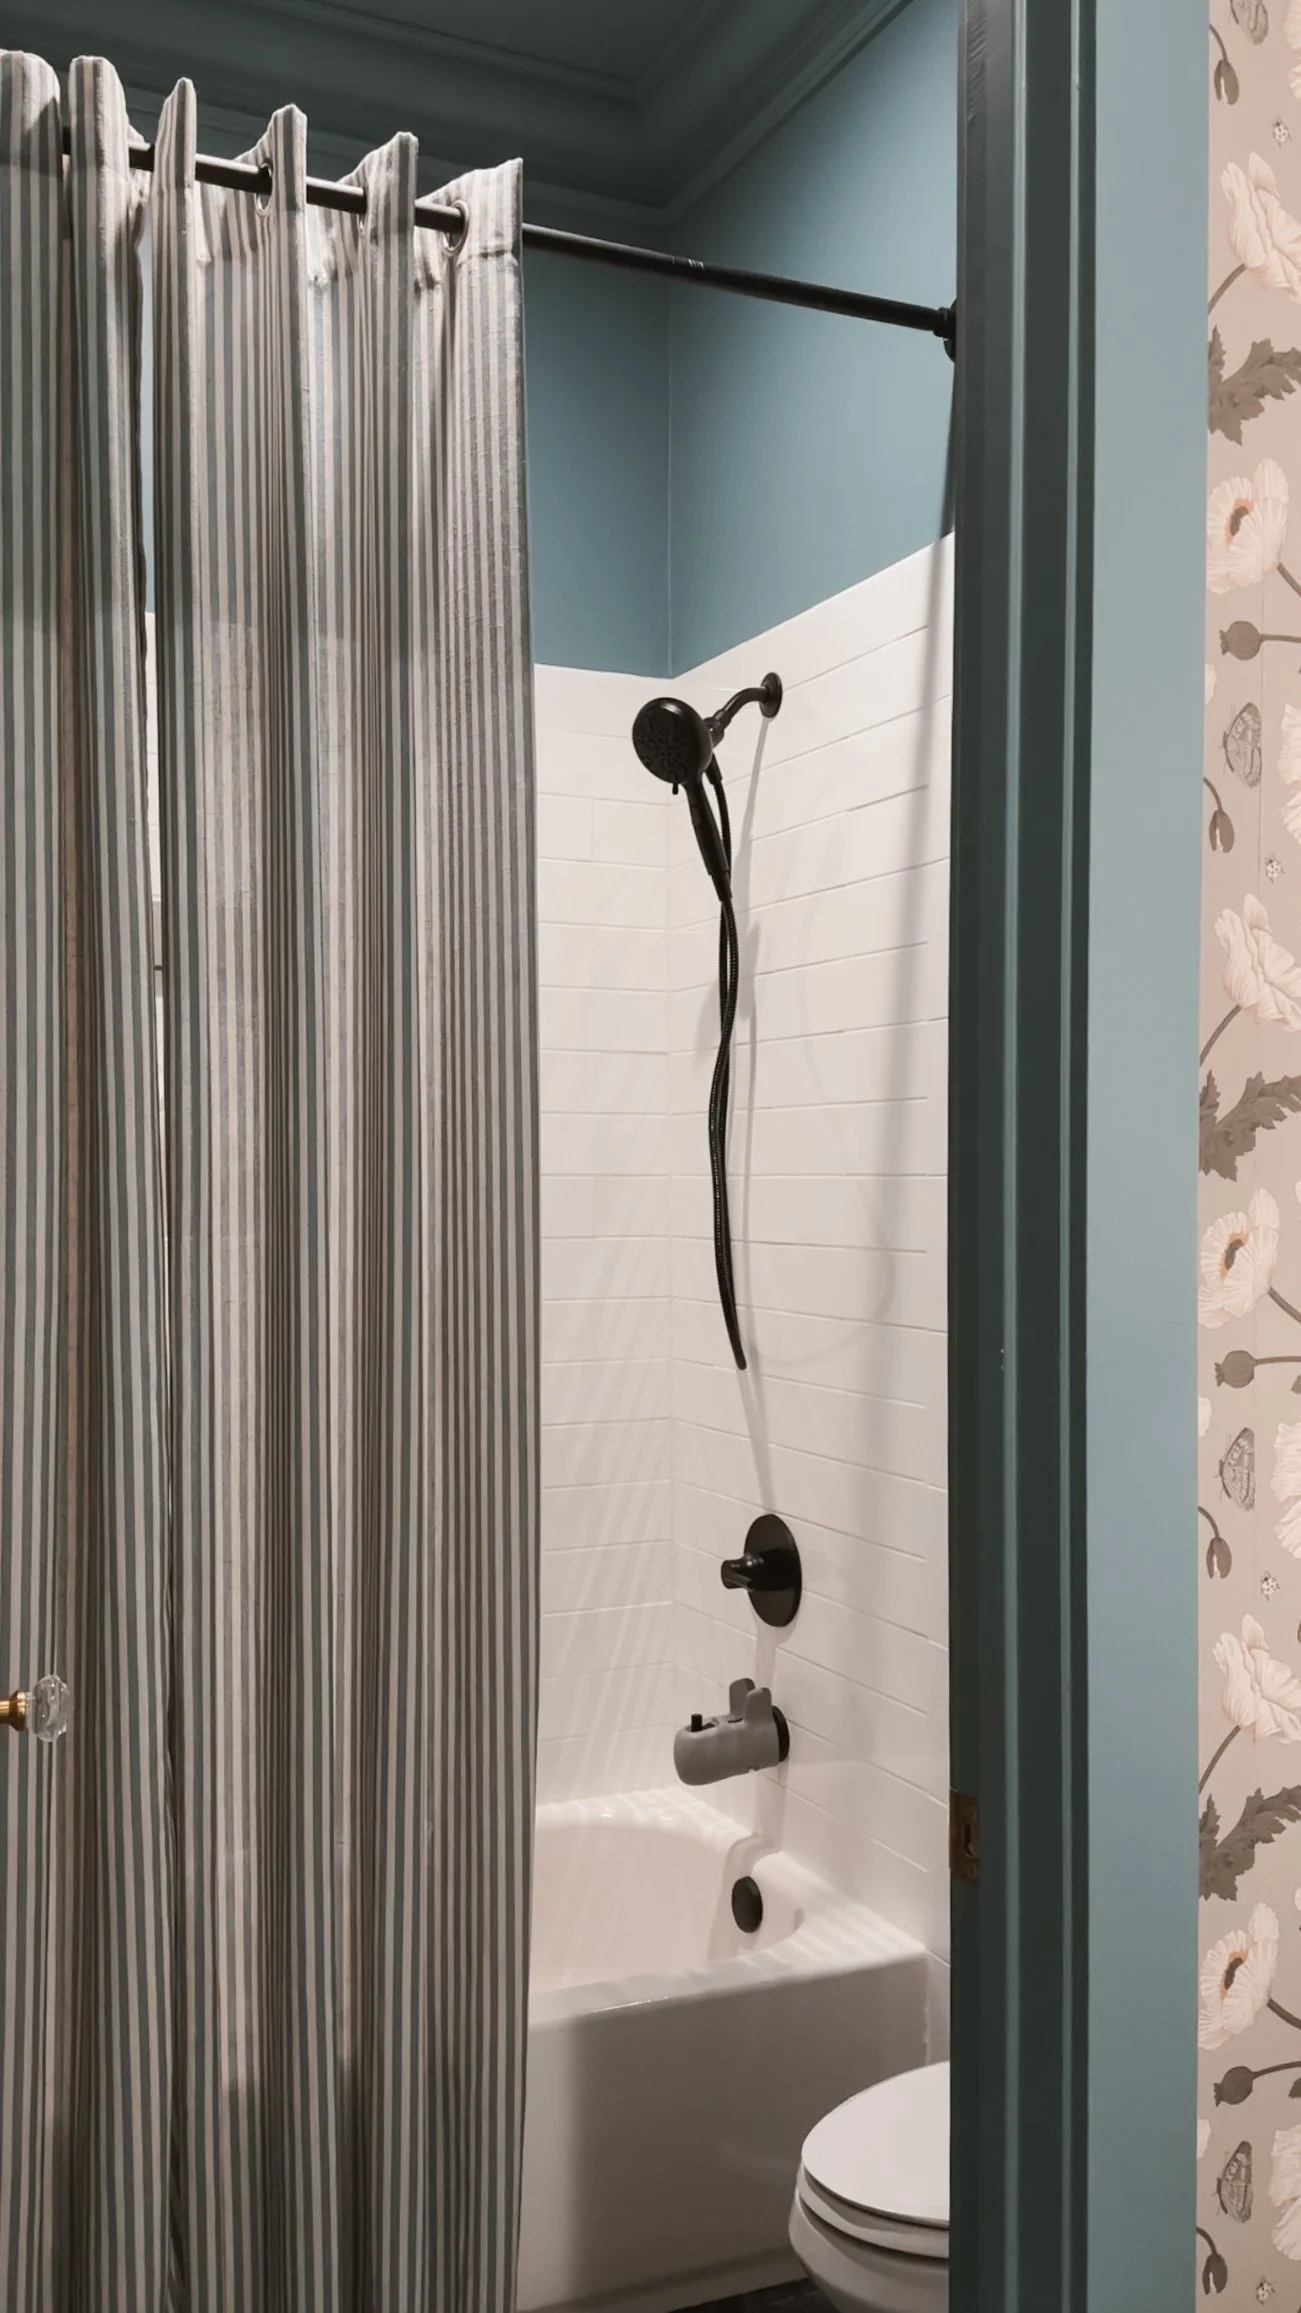
A Tranquil Blue Bathroom Retreat
Norwegian Blue by Behr brings a calming, cool tone to this beautifully color-drenched bathroom. The front room, with its sinks, features a floral wallpaper that adds texture and depth, while the back room—containing the toilet and shower—embraces the full power of this rich blue, creating a serene and cohesive feel throughout.
The eggshell sheen offers a soft, reflective glow that enhances the depth of Norwegian Blue, providing just the right amount of light without being too shiny. The color works harmoniously with the bathroom's fixtures and textures, making the space feel both fresh and tranquil. Whether you’re washing up or relaxing, this blue bathroom offers a peaceful retreat that feels timeless and inviting.
If there's something in this room that catches your eye and you'd like the link, just click here!


Warm & Inviting: A Guest Room with Rich Comfort
Nut Brown by Behr creates a cozy and welcoming atmosphere in the guest room, wrapping the space in a rich, earthy hue. Color drenching the walls in this deep brown gives the room a grounded, intimate feel, perfect for guests to relax and unwind.
The eggshell sheen adds a soft, subtle glow that highlights the depth of Nut Brown without overpowering the space. This warm, inviting color pairs beautifully with plush bedding, soft lighting, and natural wood accents, creating a serene environment that makes every guest feel at home. The timeless richness of Nut Brown ensures the room remains stylish and comfortable, offering a restful retreat for anyone who stays.
If there's something in this room that catches your eye and you'd like the link, just click here!
IF YOU ENJOYED THIS POST, YOU MIGHT BE INTERESTED IN MY playroom makeover.
FOLLOW ME ON MY SOCIALS!

Playroom Makeover
The Ultimate Playroom Makeover: A Color-Drenched Dream in Pressed Flower
If there's one space in our home that sees the most creativity, giggles, and pure joy, it's my daughter's playroom. And after its latest refresh, it’s better than ever! From the dreamy pink walls to the upgraded storage and new activity tables, every detail makes this space both beautiful and functional. Let’s dive into the details of this color-drenched paradise.


The Bold and Beautiful Wall Color
First things first: the walls! I wanted something warm, inviting, and playful, so I went all-in with Pressed Flower by Sherwin-Williams. It’s the perfect rich, rosy hue that creates a cozy yet energizing space for playtime. To add depth and character, I incorporated box moulding with basecap trim, which gives the room a touch of classic charm while keeping it playful.
A Pink Light Fixture to Tie It All Together
A pink room needs the perfect pink light fixture, and I found just the one! It adds a whimsical yet modern touch that complements the Pressed Flower walls beautifully. The soft glow makes everything feel warm and magical—exactly the vibe I wanted for this space.


Upgrading Storage: From Cube Shelf to IKEA Trofast
Storage is everything in a playroom, and I recently swapped out our basic 8-cube shelf for the IKEA Trofast system—and WOW, what a difference! The drawers make organization a breeze, keeping toys neatly tucked away but still accessible for little hands. Now, everything has a home, and clean-up time is so much easier (for both of us!).
Playroom Must-Haves: Seating, Tables, and More!
No playroom is complete without comfy seating, and the egg chair is hands-down one of the best purchases we’ve made. It’s the perfect spot for reading, relaxing, or just hanging out while playtime is in full swing.
For activities, we have a classic kids’ table, perfect for coloring and Play-Doh. And for Christmas, we added a multi-functional chalk/car/LEGO table, which has quickly become a favorite! Whether she's doodling, racing toy cars, or building her latest LEGO masterpiece, this table does it all.


Her Favorite Playroom Pieces
Some of the most-loved items in the playroom include:
Her dollhouse – an absolute steal of a deal and a favorite for hours of imaginative play.
The IKEA play kitchen – which I gave a custom makeover! (Check out the full DIY transformation here).
The easel – a chalkboard on one side, a magnetic whiteboard on the other, with an option for paper to roll down. Perfect for endless creative expression!
This playroom refresh has made such a difference in how my daughter plays and enjoys her space. It’s colorful, functional, and, most importantly, designed to grow with her. If you’re looking to revamp a playroom, my biggest tips are to prioritize storage, embrace color, and choose multi-functional pieces that can adapt as your little one’s interests evolve.
What’s your must-have for a playroom? Let me know in the comments!
Links at a glance
Paint: Pressed Flower by Sherwin Williams (Sheen is flat, but I would recommend eggshell instead)
My Whole Ikea Trofast System:
Edge Shelves (2 stacked on each edge)
Tall White Shelf (next to door)
IF YOU ENJOYED THIS POST, YOU MIGHT BE INTERESTED IN MY DIY: Wall art post.
FOLLOW ME ON MY SOCIALS!

DIY: Big Wall Art
How to Make Your Own Large-Scale Art on a Budget
Big art can be pricey, but that doesn’t mean you can’t have a statement piece in your home! I wanted a large-scale art piece without the hefty price tag, so I got creative and made one myself. Here’s how you can do it too!
Finding the Perfect Fabric
I stumbled upon a roll of upholstery fabric at an antique store for just $21—score! If you’re on the hunt for fabric, check out thrift stores, antique shops, or even repurpose curtains or shower curtains.
Building the Frame
I figured out the measurements for the size I wanted and luckily had some scrap 1x4s lying around, so I used those to create the frame. If I were to redo this, I’d add a center support piece for extra stability, but it worked out just fine!
To assemble the frame, I connected my 45-degree cuts using wood glue, brad nails, and a LOT of heavy-duty staples—seriously, like five staples per joint. It might look a little Frankenstein-ish, but hey, no one will see that part!


Attaching the Fabric
Once my frame was solid, I draped the fabric over the non-stapled side and flipped it over to make sure the pattern was straight. I started by stapling a row at the top to keep the fabric in place, then trimmed off the excess.
For the best results, I pulled the fabric tight, stapled a few spots, moved to the next side, and repeated—just working my way around to keep everything straight and even.


Hanging It Up
To hang the piece, I attached two D-ring hooks. I don’t remember the exact measurements, but I made sure to place them evenly (for example, 3 inches from the side and 2 inches from the top).
Then came the moment of truth—flipping it over for the big reveal!
I use a laser level to make sure it was on the wall perfectly straight, used toothpaste on the D-rings so I knew exactly where to put in my screws, and used anchors where there were no studs.


I absolutely love how this turned out, and it was such a budget-friendly way to get a large art piece! If you’re thinking of making your own, you can use all kinds of fabric—curtains, shower curtains, or whatever catches your eye. Give it a try and let me know how yours turns out!
If you enjoyed this post, you might be interested in my hallway makeover.
Follow me on my socials!

Hallway Makeover
What was once a plain, white hallway has now become a rich and dramatic space, thanks to wall trim, paint, new lighting and a lot of second hand finds.

Architectural Details & Moulding Upgrades
Before painting, I wanted to enhance the walls with architectural details. I added:
Chair rail (2 styles stacked) and box moulding (basecap) to the lower third of the walls for depth and texture.
Basecap moulding to the tops of my existing baseboards for an upgraded, built-in look.
Basecap trim to my 3-panel doors to add extra interest and cohesion.
These small additions made a huge difference in making the hallway feel elevated and custom. I would love to add crown moulding soon!
Paint
Color drenching was my go-to in this space using a bold coat of Reddened Earth by HGTV Home by Sherwin-Williams in a satin sheen. This warm, dusty pinky-brown hue completely transformed the area, adding depth and character while making it feel both inviting and intentional. I love how this color brings a sense of coziness while still making a statement.

Gold Details
I swapped out standard hardware for vintage-inspired solid brass doorknobs, which instantly elevated the charm of each doorway. To keep the look cohesive, I also installed solid brass light switch covers, gold outlets, and gold door hinges. These small but impactful details add a polished, timeless feel and complement the overall moody aesthetic of the space. The richness of the brass contrasts beautifully with the deeper tones in the hallway, making everything feel thoughtfully curated.
Vintage Lighting & DIY Conversions
Lighting played a big role in this makeover. I swapped out the old can lights for three vintage-inspired pendant lights that I found on Amazon (affordable and such a great find!). To make this switch, I used a can light converter, which made it super easy to install the new fixtures without an electrician and add that charming, collected feel.
DIY Gallery Wall
The focal point of the hallway is undoubtedly the collected gallery wall. I spent months sourcing the pieces from estate sales and thrift shops, and I love how each one tells a story. The mix of art, frames, and vintage finds adds so much character and makes the space feel curated and personal. (Shop my gallery wall essentials here!)

Statement Artwork & Decorative Finds
On the adjacent wall, I created a large square artwork piece using leftover wood and beautiful fabric I found at Queen of Hearts, an antique store here in Georgia. The size and floral pattern make it such a unique, personal piece.
Another standout is the bell tapestry in the center of the wall, an estate sale treasure that brings a hint of old-world charm. The brass bow plate hanger (also from Queen of Hearts) holds vintage plates I sourced from an estate sale, adding a whimsical, elegant touch. And that big red mirror? Another $30 estate sale find that ties in perfectly with the new wall color.
Finishing Touch: The Washable Rug
The hallway still features the same washable rug I’ve had for a while, and I love that it still complements the new color scheme beautifully. It adds a layer of coziness and practicality without clashing with the bold walls.

This hallway makeover proves that small spaces can have big impact when you embrace color, texture, and thoughtful details. The mix of vintage finds, DIY elements, and rich color truly makes it feel intentional, curated, and full of personality. I’m so happy with how it turned out!
Links at a glance:
If you enjoyed this post, you might be interested in my pink paloma punch recipe.
Follow me on my socials!

Pink Paloma Punch Recipe
PINK PALOMA PUNCH recipe
SERVES: 1/2 GALLON BEVERAGE DISPENSER

INGREDIENTS:
10 lbs grapefruit, squeezed
2 lbs strawberries, puréed
3 cup of tequila
7 (12oz) cans of Fresca
Optional: Garnishes (sliced grapefuit, lime, sliced jalepeño, and basil)
INSTRUCTIONS:
Juice grapefruits
Purèe strawberries
Combine grapefruit juice, strawberry purèe, tequila, and Fresca
STIR!
Garnish with your preferred choice


If you enjoyed this post, you might be interested in my wayfair finds in my home post.
Follow me on my socials!

Wayfair Finds In My Home
Wayfair has been my go-to for home decor, helping define my home’s vintage-modern style.


My favorite Wayfair additions include rust-colored swivel chairs in my moody green bedroom, along with solid brass doorknobs, light switch covers, a fireplace mantle, mirror, and white rug that tie the space together beautifully. In the dining room, I got a custom glass top made for my oval dining table, making it both durable and stylish.

My moody red bathroom makeover features toile-printed curtains used as a shower curtain (paired with a washable liner), a gold ornate mirror, a cabinet with sink attachment, and a wall sconce light. Small yet impactful details like the towel hook, brown blinds, double shower rod, gold faucet, and even a decorative toilet lever add character. Even my soap dispenser and wicker trash can are Wayfair finds!


My office features a diamond-patterned rug, while my living room boasts a stunning 4-foot sunburst wall mirror. These pieces bring warmth, sophistication, and personality to my home.


Wayfair has played a huge role in shaping my decor style, proving that the right finds—big or small—make all the difference!
LINKS AT A GLANCE
If you enjoyed this post, you might be interested in my oversized art post.
Follow me on my socials!

My Oversized Art
Oversized Art in My Entryway & Bedroom: A Bold Statement
One of my favorite ways to make a space feel grand and intentional is with oversized artwork. It’s a game-changer—especially in areas with high ceilings where you really want to embrace the scale of the space. I recently added large statement pieces from Big Wall Decor to my entryway and bedroom, and I’m obsessed with how they transformed both rooms.
Bedroom:
For my bedroom, I went with the 60”x60” Infinity Frame in black and the Black Forest III artwork. This monochromatic floral piece adds the perfect amount of moodiness and depth to my space. I love how it complements my decor while also making a bold statement against my high ceilings.


Entryway:
In my entryway, I have the 60”x90” Infinity Frame in black, and I love the versatility it offers. I switch between two different pieces depending on my mood and the season.
Beige Posy Bouquet Watercolor – This stunning floral piece is available from an artist on BigWallDecor’s website. I opted for it without the artist's signature so I could hang it horizontally, which fits my space perfectly.


For the other piece I used the Custom Artwork option. The print is called Garden in May – I took advantage of the Open Access platform from the Smithsonian, a free resource for finding and downloading copyright-free artwork. Garden in May is such a dreamy, lush piece that brings a fresh and timeless feel to my entry.
If you haven’t explored the Open Access platform yet, it’s an amazing way to source high-quality artwork at no cost. It’s one of my go-to tricks for finding unique pieces that feel curated and personal.


Why Oversized Art Works
If you’re on the fence about large-scale artwork, let me tell you—it’s worth it! Here’s why:
Makes a Space Feel Bigger – Instead of multiple smaller pieces, one oversized artwork draws the eye upward and expands the space visually.
Adds Drama & Impact – Whether it’s a soft floral or a moody monochrome, large art instantly creates a focal point.
Versatile & Changeable – With an Infinity Frame, swapping out art is easy, making it a flexible choice for ever-evolving styles.
If you’re looking to elevate your home with oversized art, Big Wall Decor has so many great options! And don’t forget to check out the Open Access platform for free artwork downloads—it’s a total hidden gem.
If you enjoyed this post, you might be interested in my Favorite things party guide.
Follow me on my socials!

Favorite Things Party

How to Throw a Favorite Things Party
If you love getting together with friends, discovering new must-have items, and leaving with some fun goodies, a Favorite Things Party is the perfect excuse to host a night in! Here’s how to plan one and make it a fun, stress-free experience for everyone. I’ve seen various ways and price points, but this is my personal favorite way to host a Favorite Things Party!
Rules for Your Guests
Set a Budget – I recommend keeping it around $20-$25 per item, but you can adjust based on what works for your group.
How Many to Bring – Each guest selects one favorite item within the set price range and brings three of that same item. You can also choose to have guests bring two instead—it’s flexible, but be clear on the invite.
Gifts Should Be Unwrapped – This makes it easier to see what’s available and speeds up the choosing process.
No White Elephant Style – No stealing! Unlike traditional gift swaps, everyone will get to pick their favorite new items instead of risking ending up with something they don’t want or already own.
Invitation Wording + Example

Make it clear what your guests need to bring! Here’s a simple invitation example:
🎉 Join Me for a Favorite Things Party! 🎉
Bring: 3 of the same item, priced around $25 each – something you LOVE!
You’ll go home with 3 new favorite things!
Snacks, drinks & fun provided. Can’t wait to see you there! ✨
📍 [Insert date, time, and location]
📩 RSVP by [date]
You can create a cute invite on Canva or even just send a group text with these details!
How It Works at the Party
When guests arrive, have them place their items on a display table.
Go around the room, and each person shares why they love their item.
Each guest picks a number out of a hat—this determines the order of choosing.
When it’s their turn, they get to select one item from the table.
Redraw numbers for each round.
Repeat until everyone has picked three items!
Do’s and Don’ts
✅ Do’s:
✔ Set a clear budget so everyone is on the same page.
✔ Encourage guests to select one really good item they personally love and bring multiples.
✔ Make it fun with drinks, snacks, and a cozy atmosphere.
✔ Let guests choose their items so they go home with things they’re excited about.
❌ Don’ts:
✖ Don’t wrap the gifts – seeing everything makes picking easier.
✖ Don’t do a white elephant-style swap where items can be stolen.
✖ Don’t make the price range too high—it should be accessible for everyone.
✖ Don’t set the price range too low. Choosing a reasonable budget helps ensure that the gifts are high-quality and feel like a special treat rather than everyday items.
✖ Avoid bringing a goody bag with multiple small items. While thoughtful, these often don’t have the same impact as one carefully chosen favorite item and tend to be picked last.
Favorite GIFT ideas:


If you’re stuck on what to bring, here are some tried-and-true favorite items that have been a hit at past parties:
I've found that the most successful items are things that feel like a little luxury—something people might have had their eye on but haven’t treated themselves to yet. For example, a candle warmer is a fantastic gift because it’s useful, but not necessarily something someone would think to buy for themselves.
On the other hand, I don’t recommend bringing a goody bag filled with multiple small items. While it might seem like a fun idea, these tend to feel like everyday purchases rather than a special treat, and they’re often chosen last. A single, well-thought-out item tends to make a bigger impact!
A Favorite Things Party is all about fun, friends, and discovering new things you’ll love! Have you ever hosted one or attended one? Let me know your favorite item you’d bring! ✨