
DIY: Big Wall Art
How to Make Your Own Large-Scale Art on a Budget
Big art can be pricey, but that doesn’t mean you can’t have a statement piece in your home! I wanted a large-scale art piece without the hefty price tag, so I got creative and made one myself. Here’s how you can do it too!
Finding the Perfect Fabric
I stumbled upon a roll of upholstery fabric at an antique store for just $21—score! If you’re on the hunt for fabric, check out thrift stores, antique shops, or even repurpose curtains or shower curtains.
Building the Frame
I figured out the measurements for the size I wanted and luckily had some scrap 1x4s lying around, so I used those to create the frame. If I were to redo this, I’d add a center support piece for extra stability, but it worked out just fine!
To assemble the frame, I connected my 45-degree cuts using wood glue, brad nails, and a LOT of heavy-duty staples—seriously, like five staples per joint. It might look a little Frankenstein-ish, but hey, no one will see that part!


Attaching the Fabric
Once my frame was solid, I draped the fabric over the non-stapled side and flipped it over to make sure the pattern was straight. I started by stapling a row at the top to keep the fabric in place, then trimmed off the excess.
For the best results, I pulled the fabric tight, stapled a few spots, moved to the next side, and repeated—just working my way around to keep everything straight and even.


Hanging It Up
To hang the piece, I attached two D-ring hooks. I don’t remember the exact measurements, but I made sure to place them evenly (for example, 3 inches from the side and 2 inches from the top).
Then came the moment of truth—flipping it over for the big reveal!
I use a laser level to make sure it was on the wall perfectly straight, used toothpaste on the D-rings so I knew exactly where to put in my screws, and used anchors where there were no studs.


I absolutely love how this turned out, and it was such a budget-friendly way to get a large art piece! If you’re thinking of making your own, you can use all kinds of fabric—curtains, shower curtains, or whatever catches your eye. Give it a try and let me know how yours turns out!
If you enjoyed this post, you might be interested in my hallway makeover.
Follow me on my socials!

Hallway Makeover
What was once a plain, white hallway has now become a rich and dramatic space, thanks to wall trim, paint, new lighting and a lot of second hand finds.

Architectural Details & Moulding Upgrades
Before painting, I wanted to enhance the walls with architectural details. I added:
Chair rail (2 styles stacked) and box moulding (basecap) to the lower third of the walls for depth and texture.
Basecap moulding to the tops of my existing baseboards for an upgraded, built-in look.
Basecap trim to my 3-panel doors to add extra interest and cohesion.
These small additions made a huge difference in making the hallway feel elevated and custom. I would love to add crown moulding soon!
Paint
Color drenching was my go-to in this space using a bold coat of Reddened Earth by HGTV Home by Sherwin-Williams in a satin sheen. This warm, dusty pinky-brown hue completely transformed the area, adding depth and character while making it feel both inviting and intentional. I love how this color brings a sense of coziness while still making a statement.

Gold Details
I swapped out standard hardware for vintage-inspired solid brass doorknobs, which instantly elevated the charm of each doorway. To keep the look cohesive, I also installed solid brass light switch covers, gold outlets, and gold door hinges. These small but impactful details add a polished, timeless feel and complement the overall moody aesthetic of the space. The richness of the brass contrasts beautifully with the deeper tones in the hallway, making everything feel thoughtfully curated.
Vintage Lighting & DIY Conversions
Lighting played a big role in this makeover. I swapped out the old can lights for three vintage-inspired pendant lights that I found on Amazon (affordable and such a great find!). To make this switch, I used a can light converter, which made it super easy to install the new fixtures without an electrician and add that charming, collected feel.
DIY Gallery Wall
The focal point of the hallway is undoubtedly the collected gallery wall. I spent months sourcing the pieces from estate sales and thrift shops, and I love how each one tells a story. The mix of art, frames, and vintage finds adds so much character and makes the space feel curated and personal. (Shop my gallery wall essentials here!)

Statement Artwork & Decorative Finds
On the adjacent wall, I created a large square artwork piece using leftover wood and beautiful fabric I found at Queen of Hearts, an antique store here in Georgia. The size and floral pattern make it such a unique, personal piece.
Another standout is the bell tapestry in the center of the wall, an estate sale treasure that brings a hint of old-world charm. The brass bow plate hanger (also from Queen of Hearts) holds vintage plates I sourced from an estate sale, adding a whimsical, elegant touch. And that big red mirror? Another $30 estate sale find that ties in perfectly with the new wall color.
Finishing Touch: The Washable Rug
The hallway still features the same washable rug I’ve had for a while, and I love that it still complements the new color scheme beautifully. It adds a layer of coziness and practicality without clashing with the bold walls.
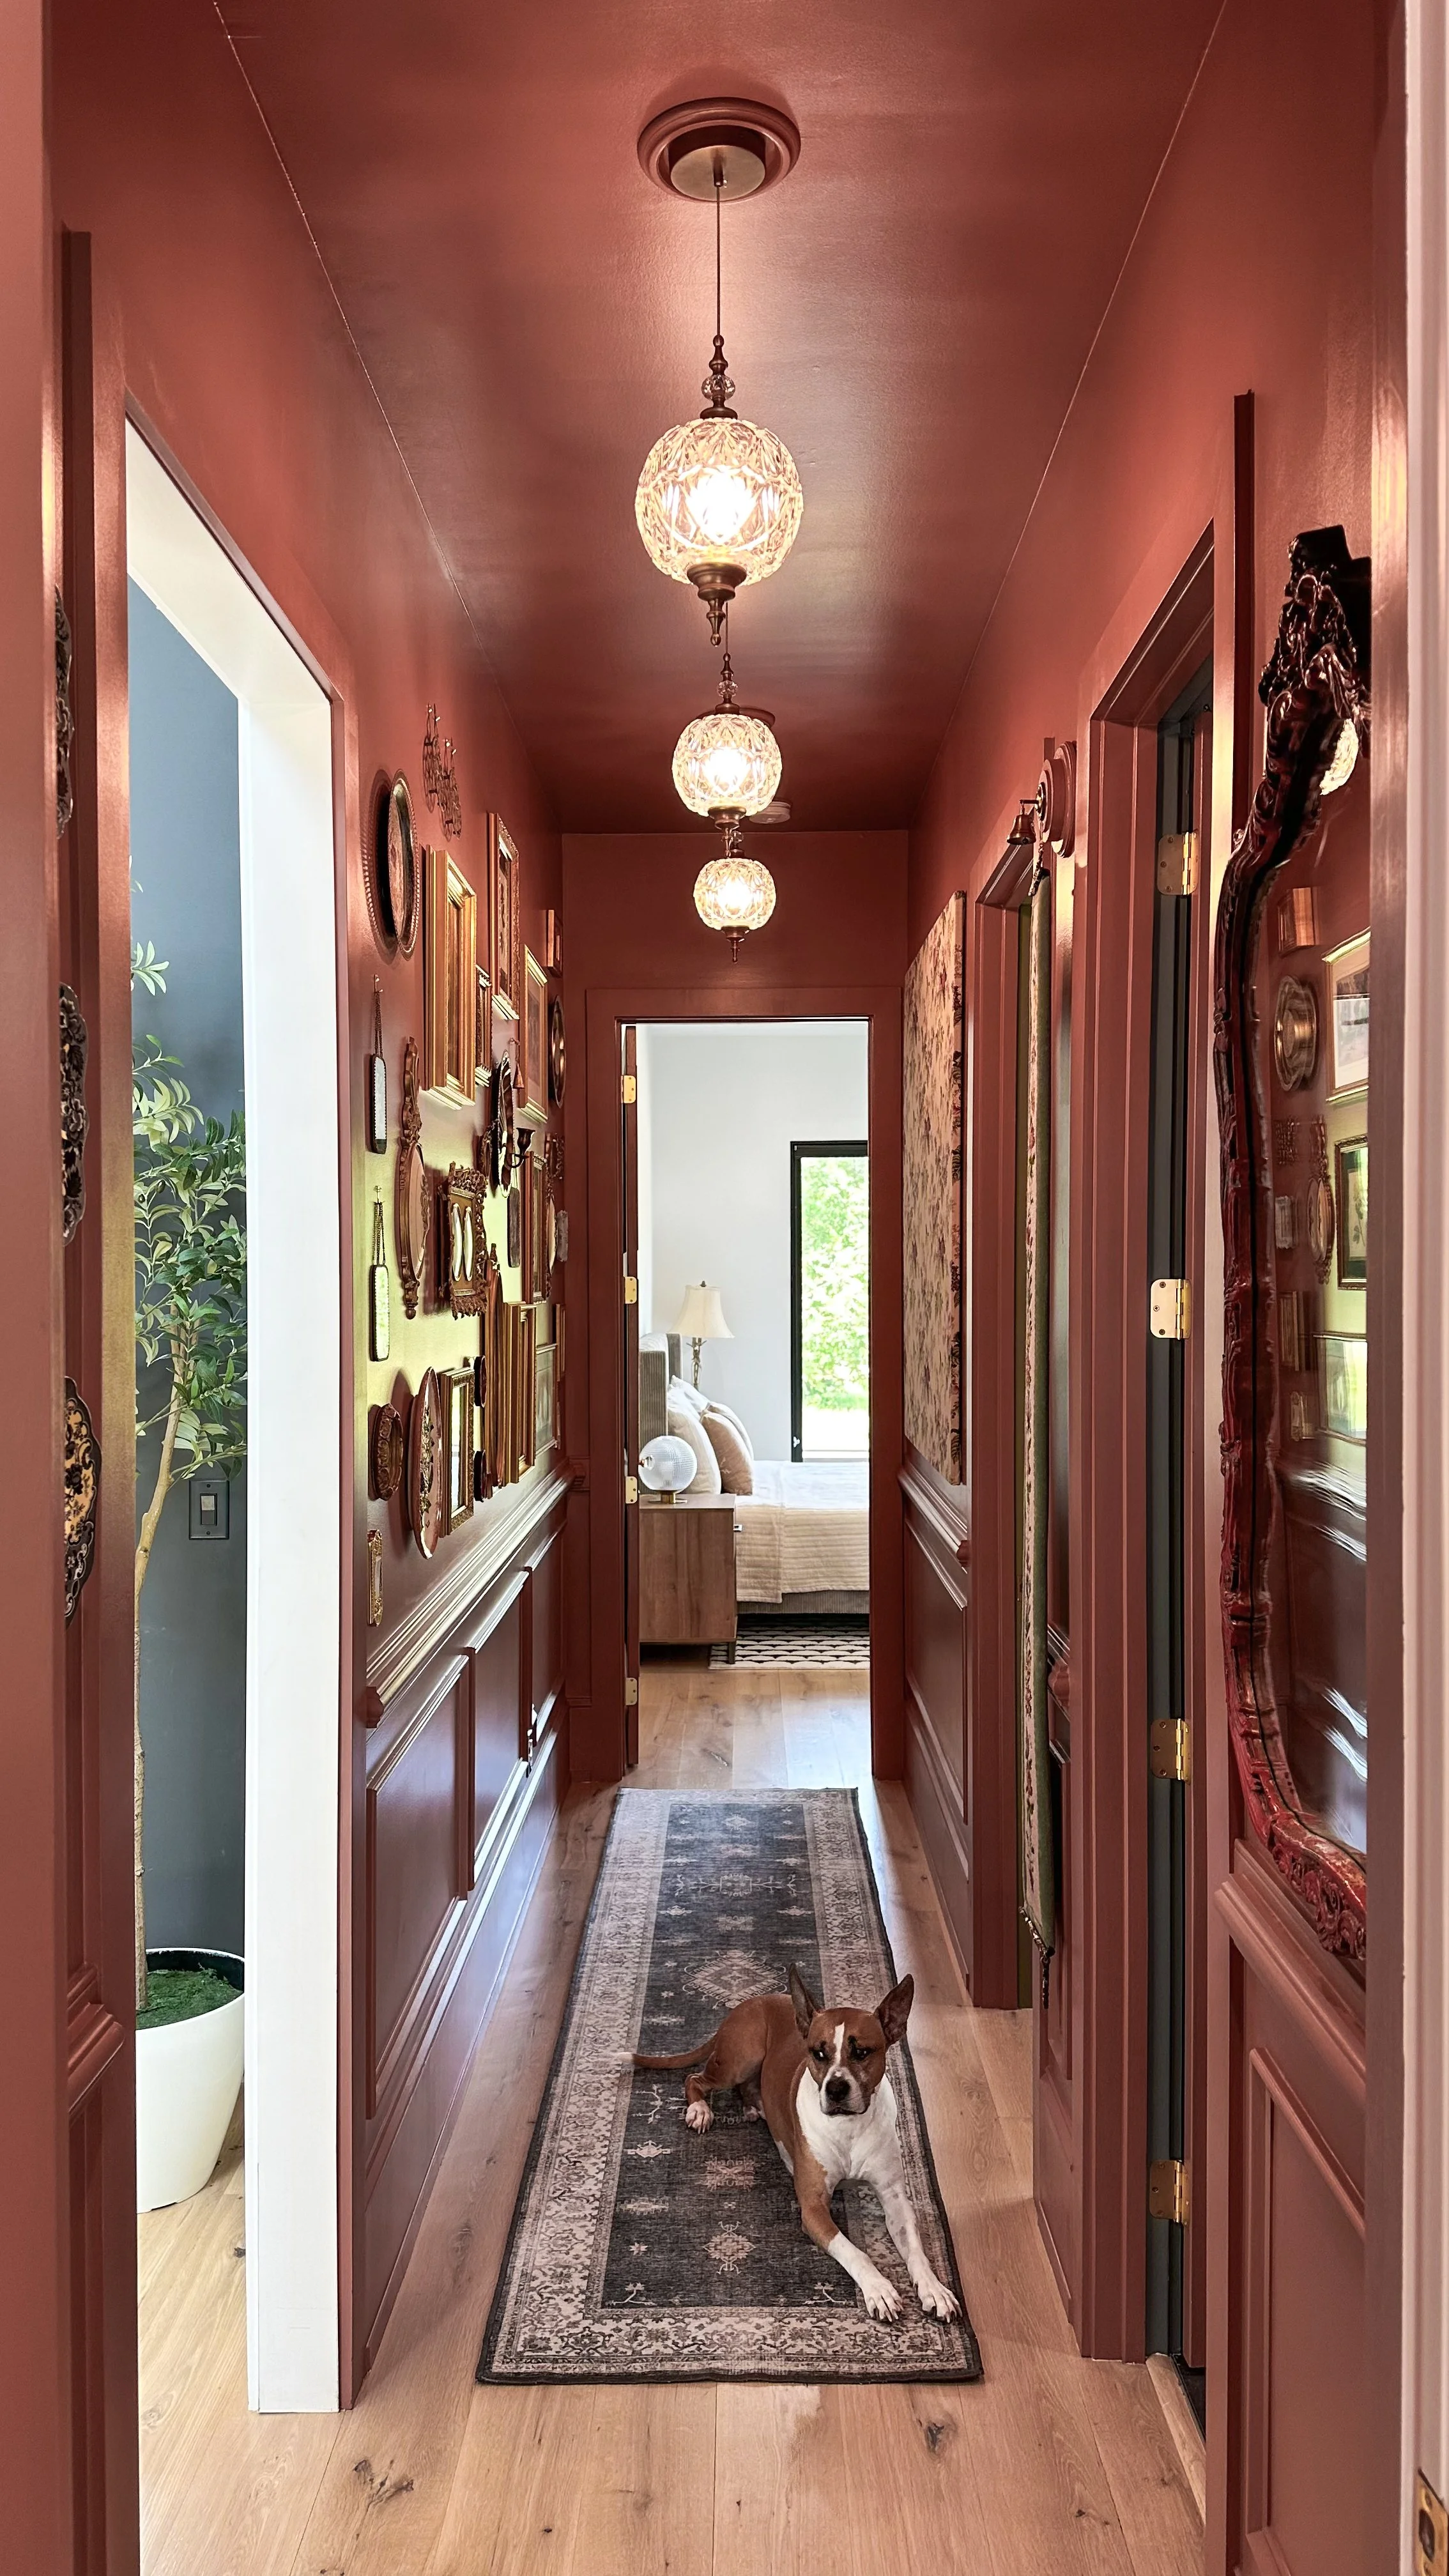

This hallway makeover proves that small spaces can have big impact when you embrace color, texture, and thoughtful details. The mix of vintage finds, DIY elements, and rich color truly makes it feel intentional, curated, and full of personality. I’m so happy with how it turned out!
Links at a glance:
If you enjoyed this post, you might be interested in my pink paloma punch recipe.
Follow me on my socials!

My Oversized Art
Oversized Art in My Entryway & Bedroom: A Bold Statement
One of my favorite ways to make a space feel grand and intentional is with oversized artwork. It’s a game-changer—especially in areas with high ceilings where you really want to embrace the scale of the space. I recently added large statement pieces from Big Wall Decor to my entryway and bedroom, and I’m obsessed with how they transformed both rooms.
Bedroom:
For my bedroom, I went with the 60”x60” Infinity Frame in black and the Black Forest III artwork. This monochromatic floral piece adds the perfect amount of moodiness and depth to my space. I love how it complements my decor while also making a bold statement against my high ceilings.


Entryway:
In my entryway, I have the 60”x90” Infinity Frame in black, and I love the versatility it offers. I switch between two different pieces depending on my mood and the season.
Beige Posy Bouquet Watercolor – This stunning floral piece is available from an artist on BigWallDecor’s website. I opted for it without the artist's signature so I could hang it horizontally, which fits my space perfectly.


For the other piece I used the Custom Artwork option. The print is called Garden in May – I took advantage of the Open Access platform from the Smithsonian, a free resource for finding and downloading copyright-free artwork. Garden in May is such a dreamy, lush piece that brings a fresh and timeless feel to my entry.
If you haven’t explored the Open Access platform yet, it’s an amazing way to source high-quality artwork at no cost. It’s one of my go-to tricks for finding unique pieces that feel curated and personal.


Why Oversized Art Works
If you’re on the fence about large-scale artwork, let me tell you—it’s worth it! Here’s why:
Makes a Space Feel Bigger – Instead of multiple smaller pieces, one oversized artwork draws the eye upward and expands the space visually.
Adds Drama & Impact – Whether it’s a soft floral or a moody monochrome, large art instantly creates a focal point.
Versatile & Changeable – With an Infinity Frame, swapping out art is easy, making it a flexible choice for ever-evolving styles.
If you’re looking to elevate your home with oversized art, Big Wall Decor has so many great options! And don’t forget to check out the Open Access platform for free artwork downloads—it’s a total hidden gem.
If you enjoyed this post, you might be interested in my Favorite things party guide.
Follow me on my socials!

Primary Bedroom

When we first moved into our home, our primary bedroom was as plain as could be—white walls, no character, nothing special. I knew I wanted to transform it into a moody, vintage-inspired retreat, so I went all in, and let me tell you—it was worth it!


The first thing I did was add wall panel moulding and crown moulding to give the space that classic, architectural feel. To take it up another notch, I installed a fireplace and a ceiling medallion, both of which instantly added charm and history to the room. Then came the paint—color drenching the entire space in a deep, rich green called Field Trip by Clare Paint. I used a paint sprayer to get the job done after installing the moulding because painting all those details by hand would have taken forever. If you’re considering a project like this, I highly recommend a sprayer to save time and get a flawless finish.
For furniture, I mixed vintage and modern pieces to create a layered look. My nightstands are from TJ Maxx, and the vintage bedside table lamps and stunning chandelier are both from an antique store called Queen of Hearts. The arched canopy bed brings a modern touch, while the solid brass door knobs, switch plate covers, and hinges add a timeless elegance. The white rug helps balance out all the dark tones and keeps the space from feeling too heavy.
To bring in texture, I added bird-patterned curtains that feel playful yet sophisticated. The mirror in the room is grand, gold, and absolutely stunning—one of my favorite pieces. For art, I incorporated a black and white print from BigWallDecor, along with a vintage piece I found at an estate sale next door when we first moved in. I also brought in a live-edge console table from World Market to add a bit of organic warmth. To finish the space, I added two rust-colored swivel chairs, which not only make the room feel cozy but also bring in another modern touch.


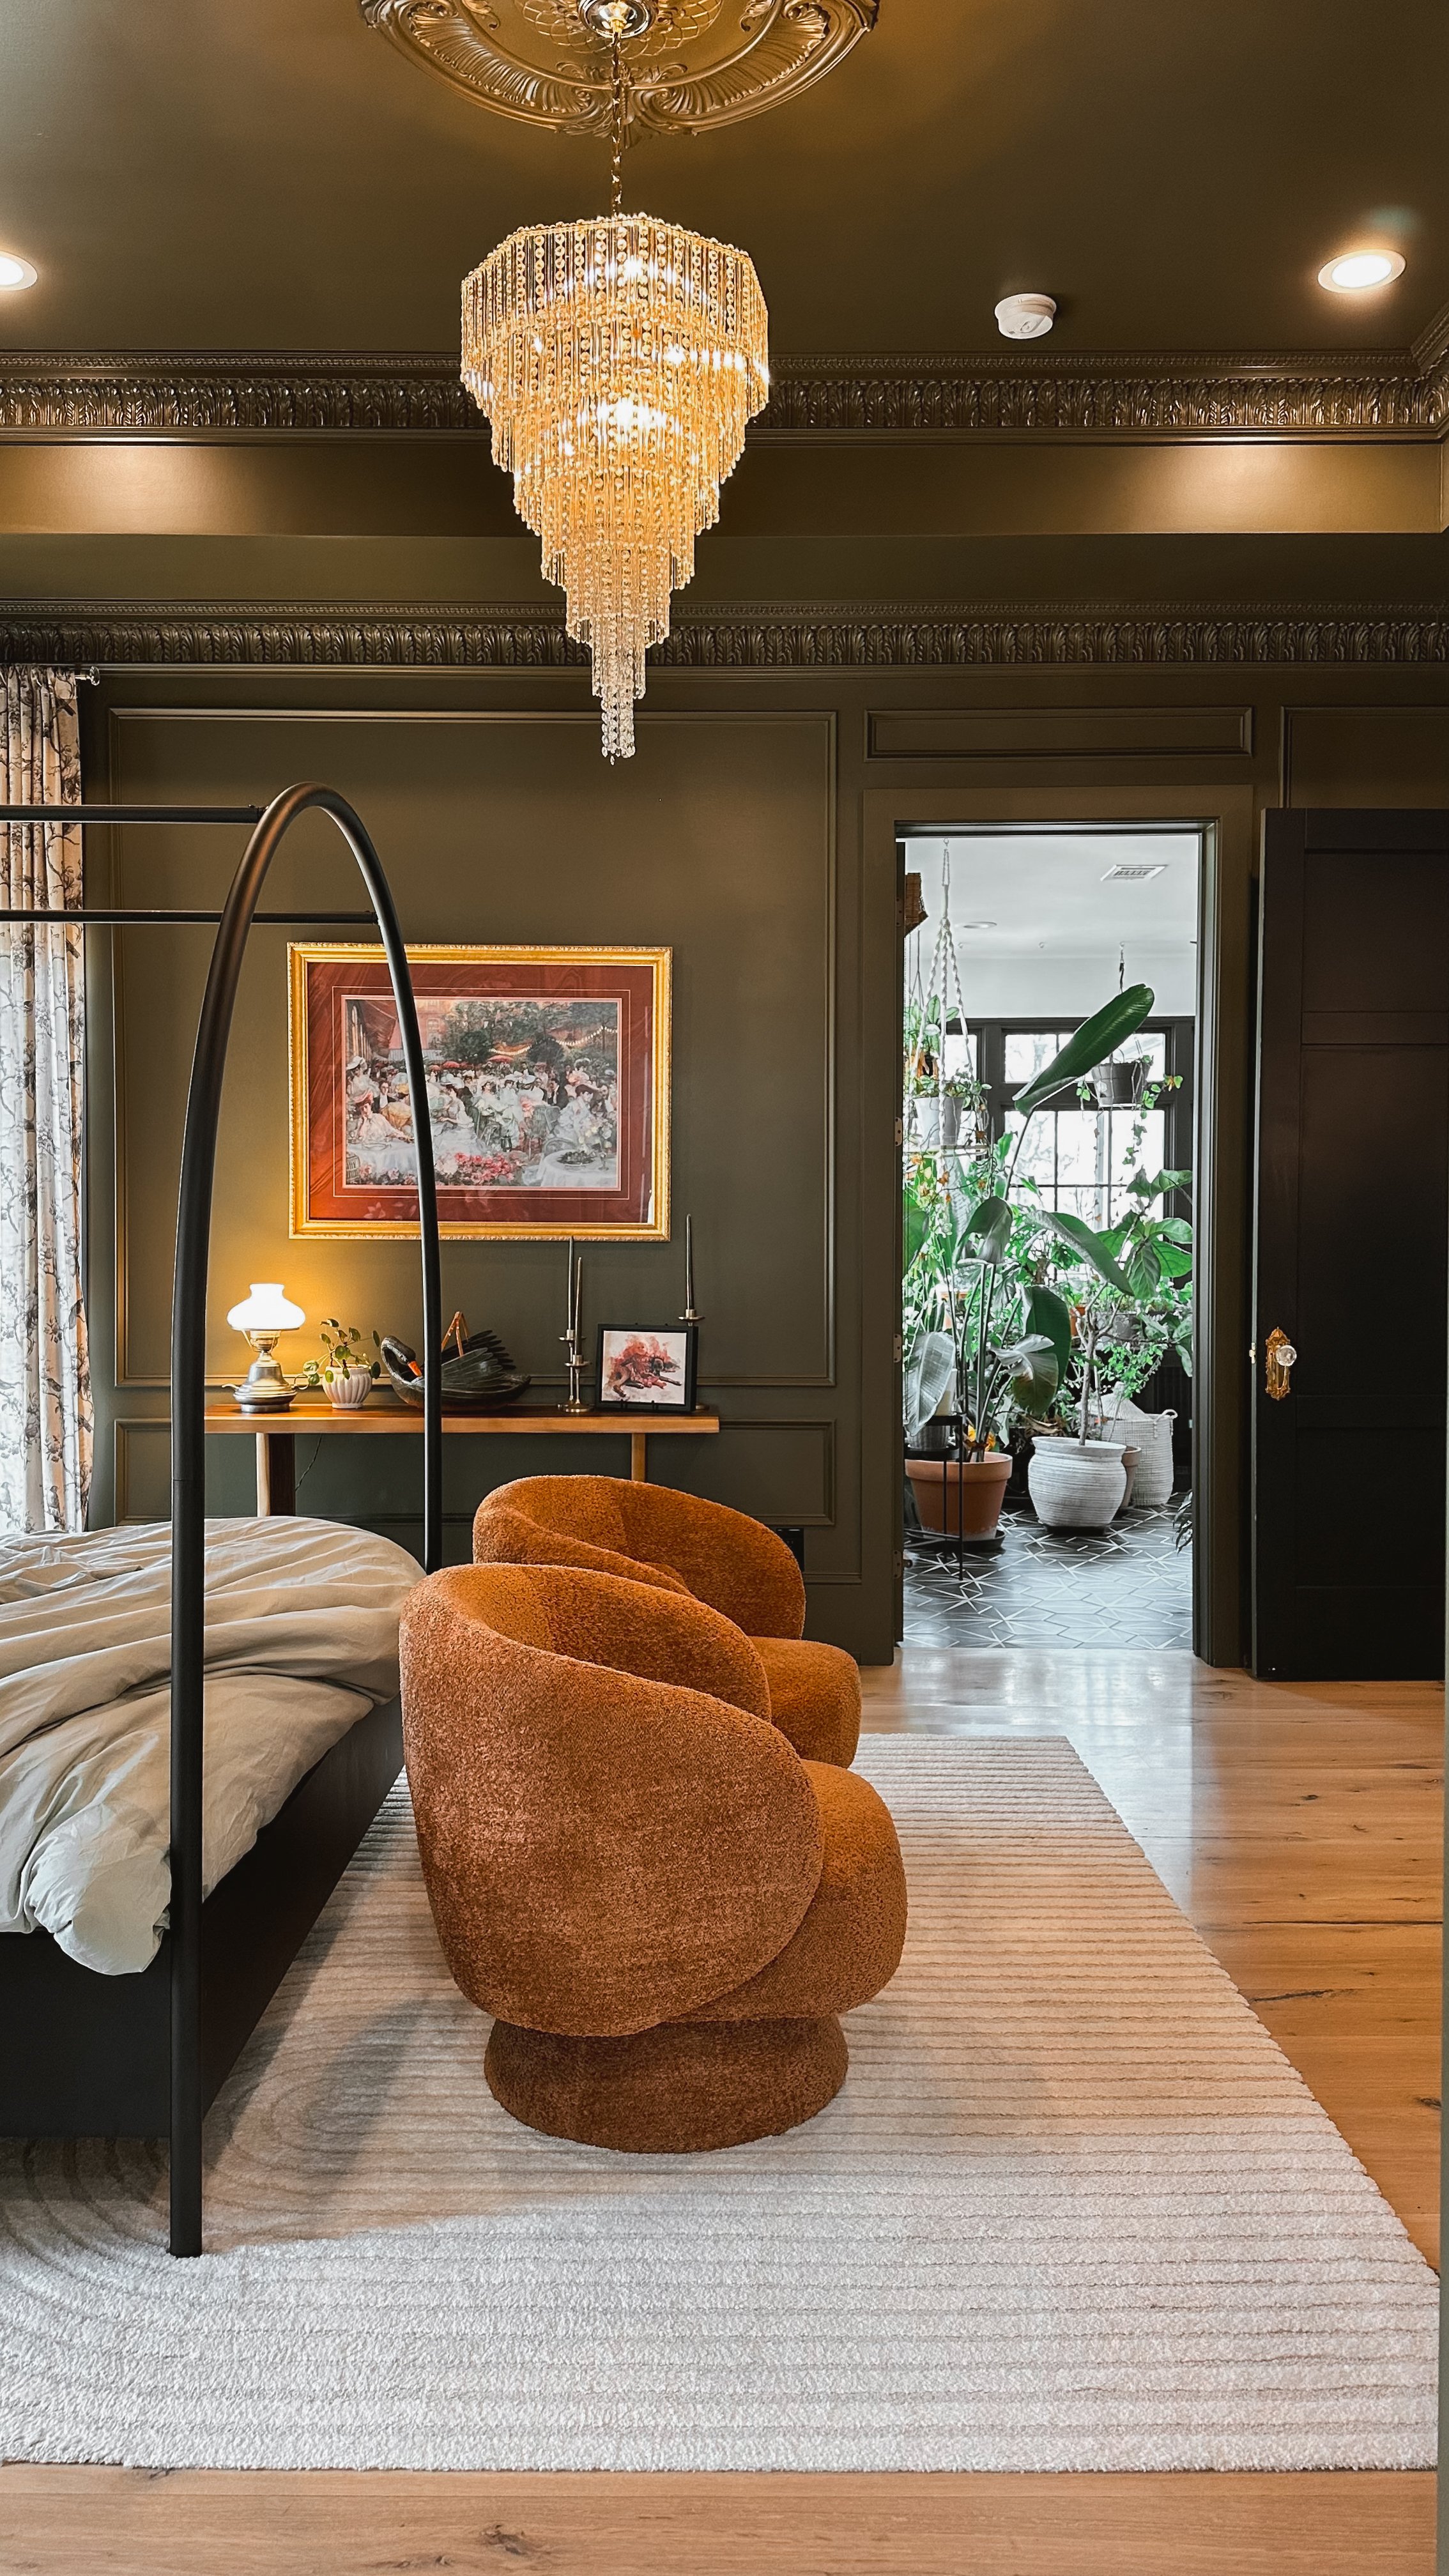


This room has truly become my favorite space in the house. It’s the one that defined my home decor style—moody, vintage, and a little bit modern. Every time I walk in, I feel like I’m stepping into a space that tells a story, and I wouldn’t change a thing.
Links at a glance
Nightstands: TJ Maxx
Gold Framed Art: Antique Store
Chandelier: Queen of Hearts Antiques & Interiors
TV Frame: DIY Project (similar option here!, use code LUTZGOHOME to save $)
White Column Pedestal Stand: Antique Store
Large White Vase: At Home
Gold Planter: Estate Sale
If you enjoyed this post, you might be interested in my Big Girl Room refresh.
Follow me on my socials!

Big Girl Room Refresh
The transition from a tiny toddler room to a big girl space has been both so sweet and a little bittersweet. The biggest change? Her full-size bed, which I found on Facebook Marketplace. The seller, an older gentleman, told me it was his childhood bed and later used by his own kids—how special is that?
And if you’re wondering, “Wait, where’s all the kid stuff?”—don’t worry! She has an entire playroom filled with every toy she could possibly want. Her bedroom is all about sleep, stuffed animals, and her ever-growing collection of books.
One of the best additions has been the two nightstands. They give her plenty of space for her Tonie box (her absolute favorite), her must-have flashlight, whatever books she’s into that night, and extra storage she can grow into. It’s been such a fun little refresh!

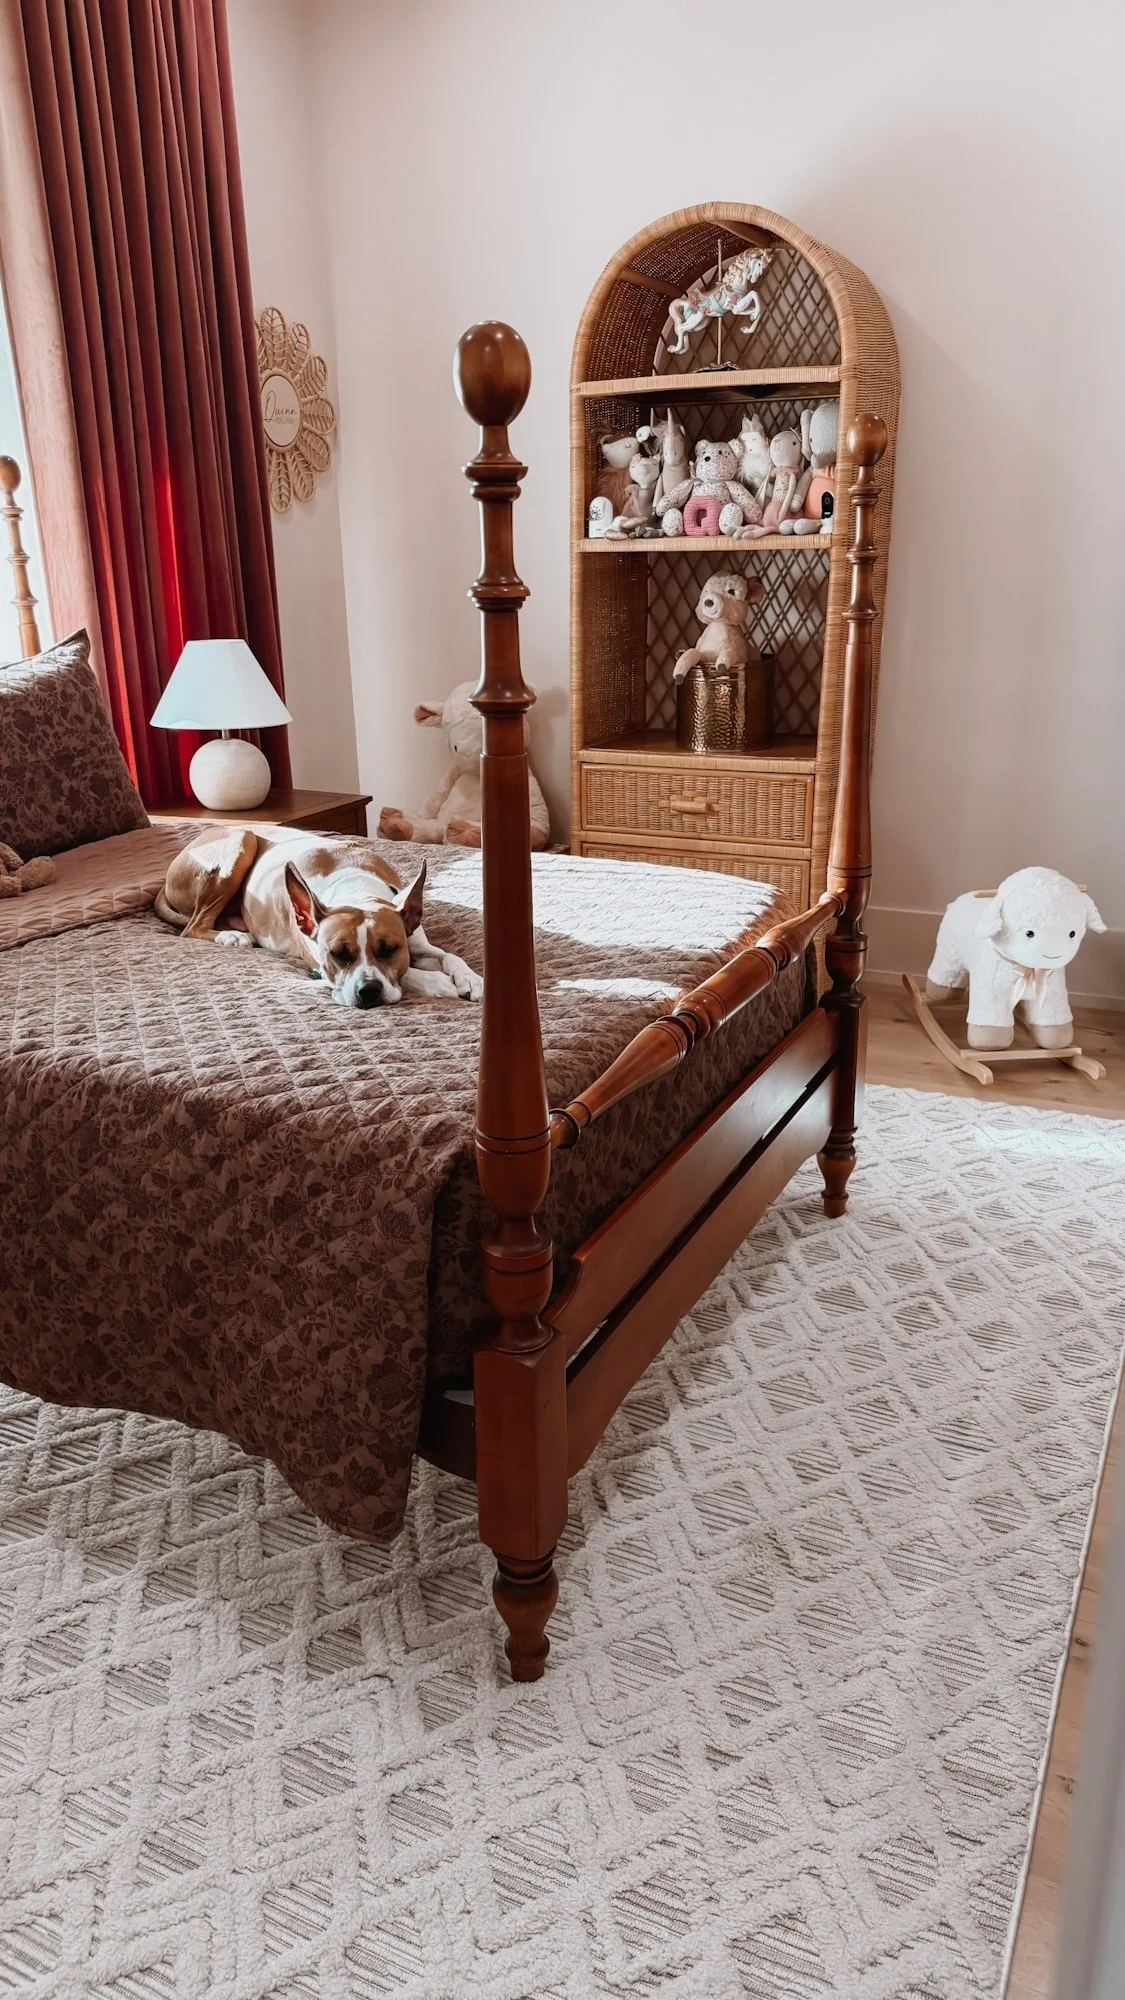

Believe it or not, the bedding is a Sam’s Club find! I love that it’s a soft pinky-purple with flowers—cute but still muted and calming, just like the rest of the room. We rotate between two sets of sheets, one solid pink and one floral, which keeps things feeling fresh. And I have to shout out this mattress cover—it’s a little pricey, but absolutely nothing has leaked through. Now I feel like I need one for every bed in the house!


This room will always be evolving, just like she is, but I love how it’s coming together. It feels cozy, calm, and perfectly suited to this new stage of life. From the special vintage bed to the little details that make it functional and fun, it’s been such a sweet transition. I can’t wait to see how it continues to grow with her!
Links at a glance
Rattan Arched Cabinet: Facebook Marketplace
Bed Frame: Facebook Marketplace
Dresser: Queen of Hearts Antiques & Interiors


If you enjoyed this post, you might be interested in my En suite guest bathroom reveal.
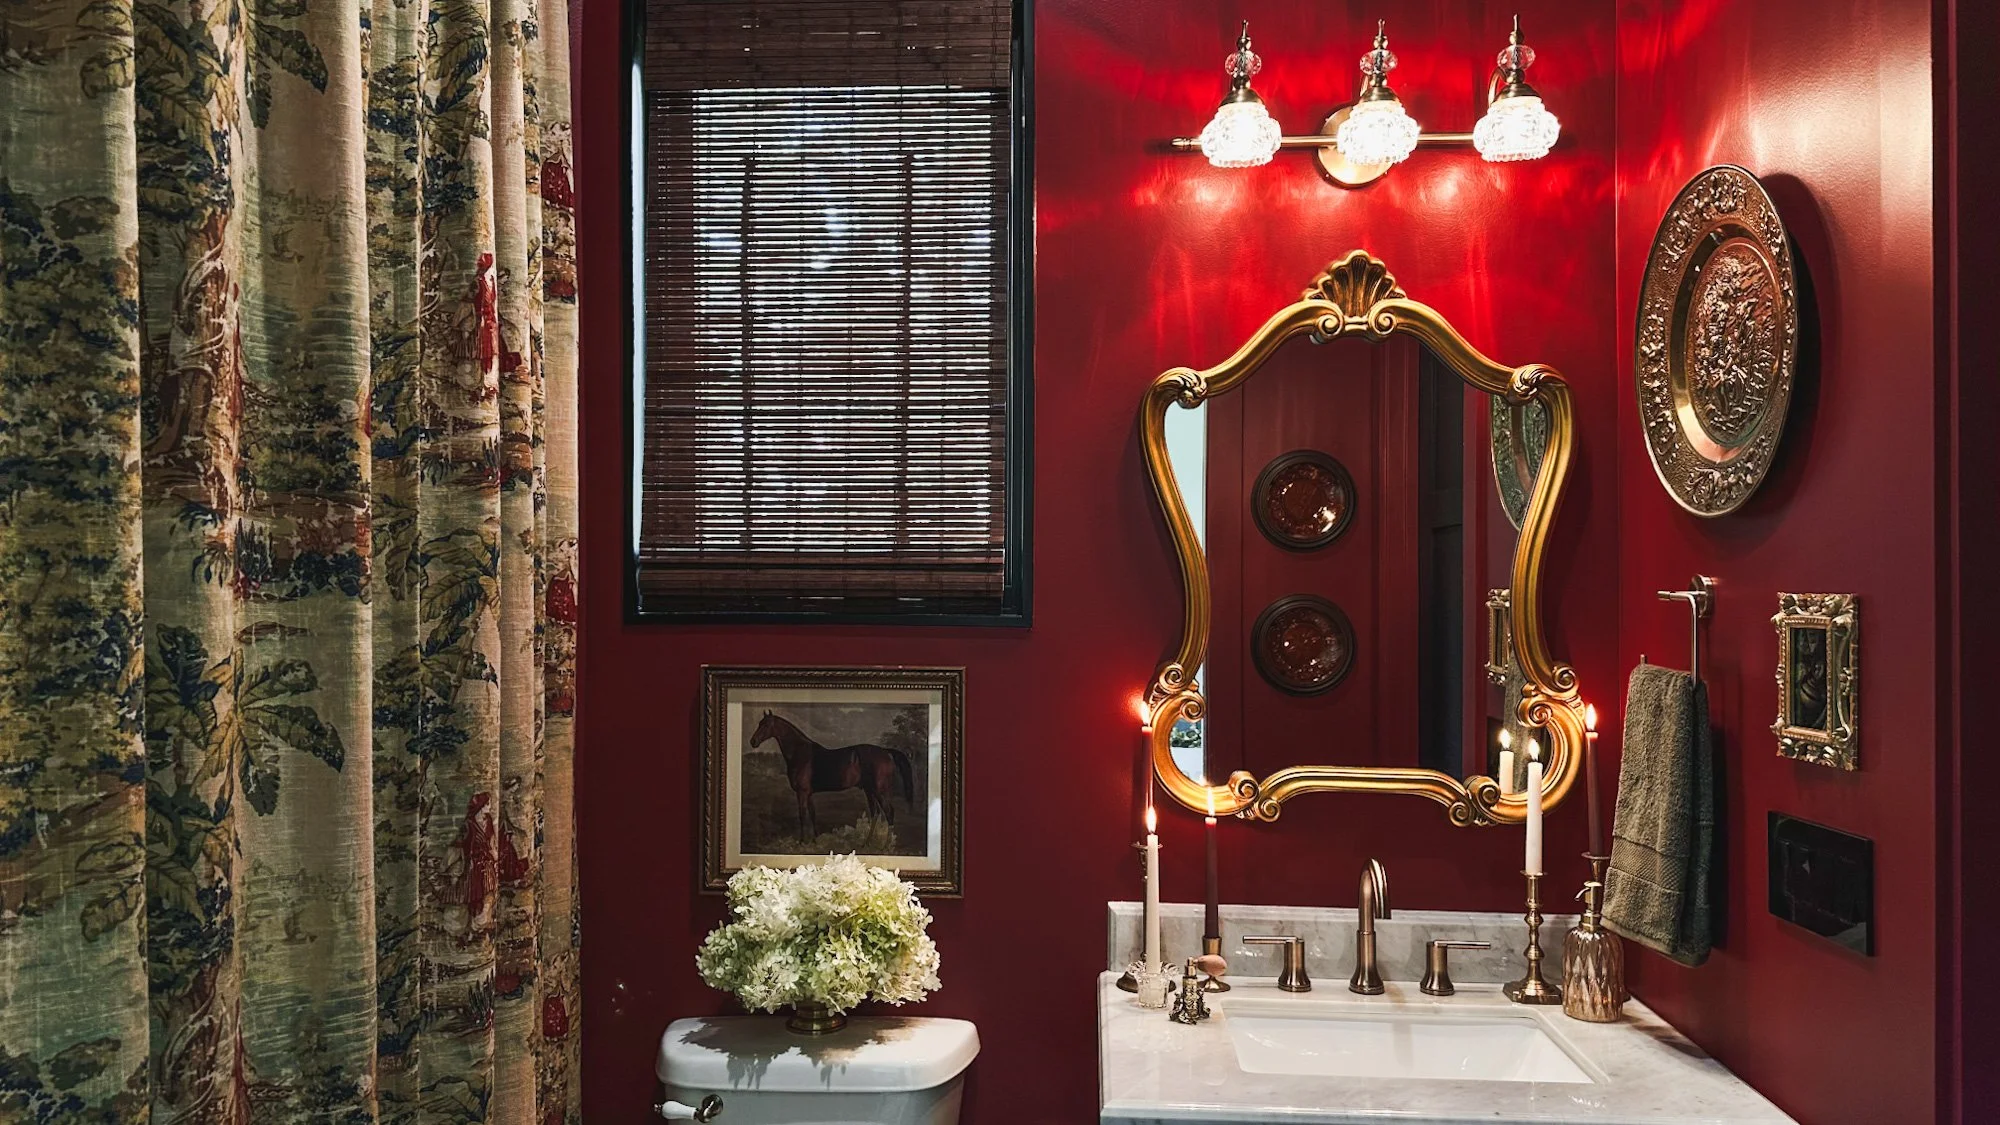
En Suite Guest Bathroom Reveal
After years of keeping our guest en suite bathroom all white, I finally took the leap and gave it a moody makeover—and I couldn’t be happier with the transformation. I drenched the walls in Salute by Sherwin-Williams, creating a bold and dramatic backdrop. Instead of a traditional shower curtain, I opted for a tall window curtain paired with a washable liner, adding a unique touch and going extra tall to emphasize the height of the ceiling. Gold accents throughout the space elevate the design, and I created a balance of new and old by combining easy-to-find pieces from Amazon, Wayfair, and Target with some of my favorite estate sale and thrifted treasures. Even the smallest details, like swapping out the toilet lever and toilet paper holder, were carefully considered. Every change made such a big impact in this small space.


