
Blue Floral Bathroom Makeover
A Blue Floral Bathroom Makeover: From Stark White to Stunning!
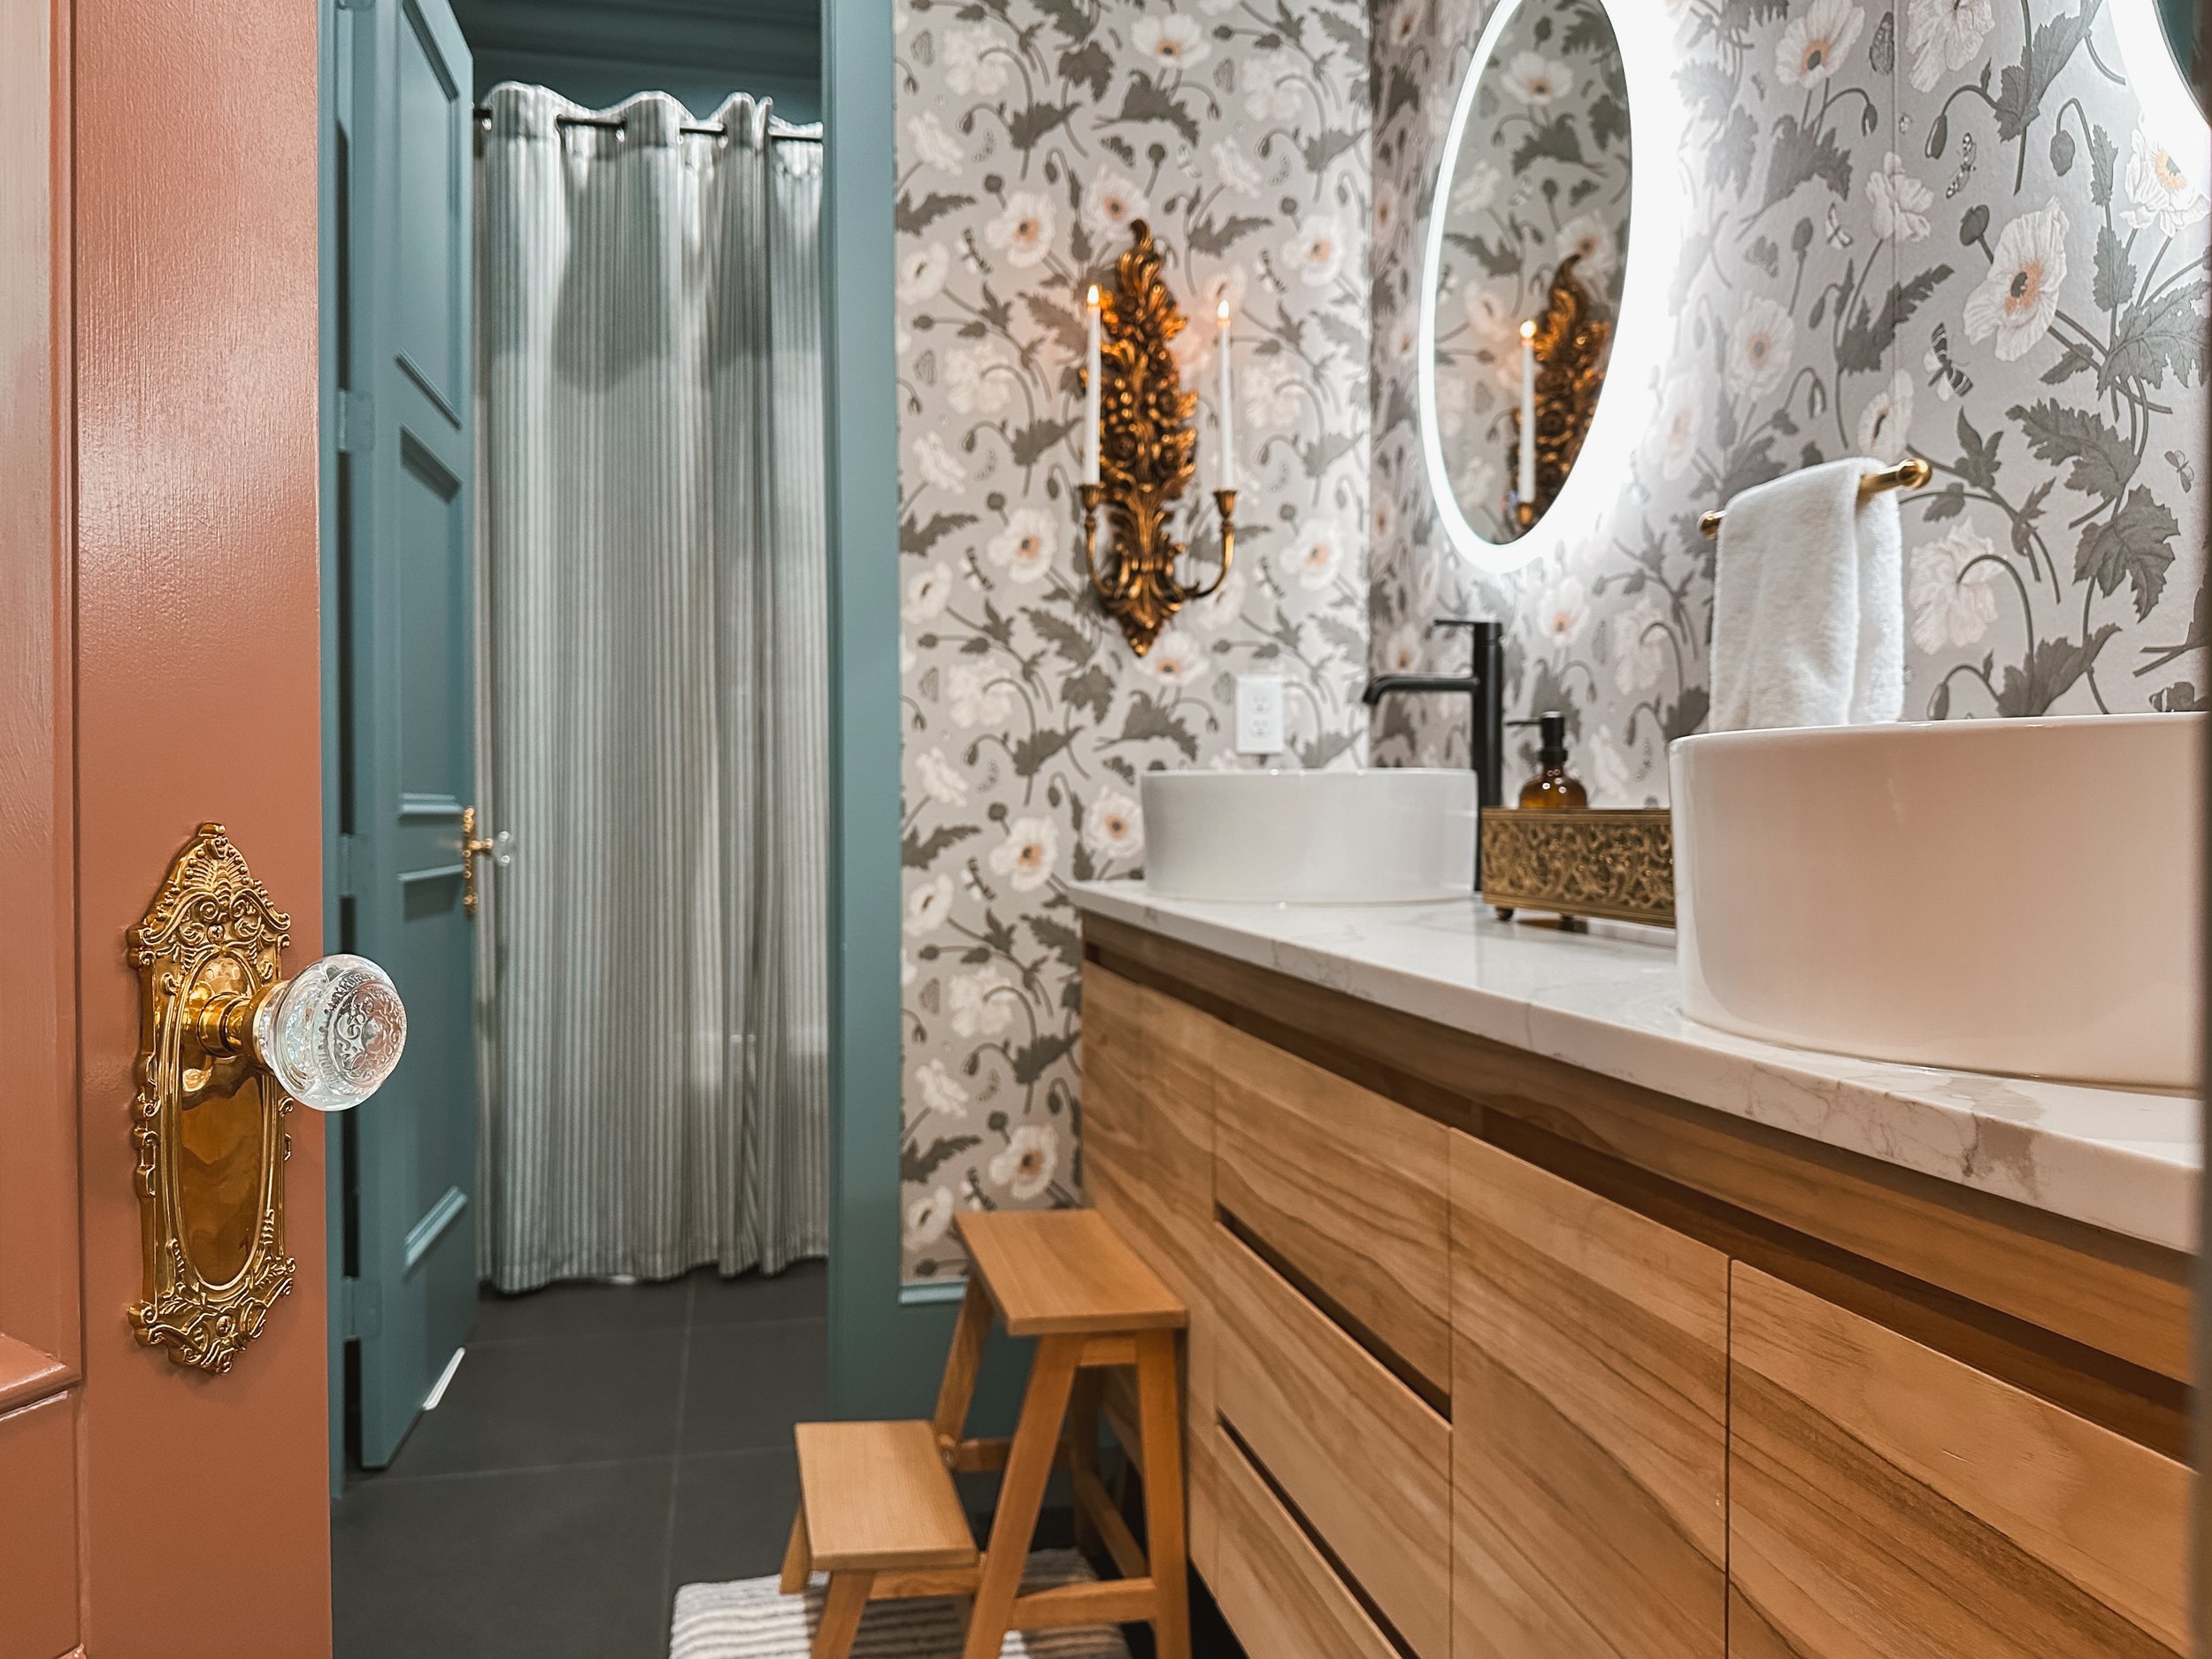
There’s nothing quite like a fresh, stylish bathroom makeover to completely transform a space! When I started this project, I knew I wanted something bold yet elegant, and the moment I saw the Natalia by Peel and Paper wallpaper, I was hooked. This gorgeous blue floral pattern was the perfect starting point, and with Peel and Paper’s customizable color options, I was able to make it truly my own! Plus, their matte peel-and-stick paper (not vinyl!) offers a seamless butted joint application—no overlap! If you’re looking to try it yourself, don’t forget to use code LUTZGOHOME10 for 10% off!


Finding the Perfect Paint Match
The next step was finding the ideal paint color to complement the wallpaper, and let me tell you—it was no easy task! I knew I wanted something that would enhance the beautiful floral design without overpowering it, so I narrowed it down to a few options (as seen in the image). After testing several shades and seeing how they played with the natural lighting in the space, I ultimately landed on Norwegian Blue by Behr in an eggshell sheen.
This soft yet rich tone struck the perfect balance—it adds depth and contrast while still feeling cohesive with the wallpaper’s muted greens, warm neutrals, and subtle pops of color. The eggshell finish gives it just the right amount of sophistication, offering a slight sheen without being too reflective.


Elevating the Details: Base Cap molding
Once I had my color scheme set, I turned my focus to adding base cap molding to the baseboards and doors. This small but impactful detail adds an extra layer of character and polish to the space, giving it a more refined and custom look. Base cap molding enhances the depth and dimension of standard baseboards, making them appear more substantial and decorative without requiring a full replacement. It’s one of those subtle upgrades that might not immediately stand out but makes a huge difference in the overall feel of a room.
If you’re considering this, it’s an easy and budget-friendly DIY project that can completely transform your space. With just a little measuring, cutting, and nailing, you can give your baseboards and door frames a high-end, finished look. Plus, it’s a great way to add charm to older homes or bring more architectural interest to newer builds. Whether you prefer a sleek, modern vibe or a more traditional aesthetic, base cap molding is a simple yet effective way to elevate your home’s design. Trust me—it’s a small detail that makes a big impact!


Elevating the Details: Crown Molding
After that I moved on to one of my favorite design elements—crown molding! There’s just something about adding that extra touch at the top of a room that makes everything feel more polished and elegant. Not only does crown molding elevate the overall look, but it also has a little design magic to it—it draws the eye upward, creating the illusion of a taller ceiling and a more spacious room.
One of my favorite tricks when working with crown molding is to paint it the same color as the ceiling. This simple choice creates a smooth, seamless transition between the walls and ceiling, making the space feel more open and cohesive. Plus, it softens the contrast between surfaces, giving the room a light and airy feel rather than a choppy, broken-up look. Whether you’re working with a traditional or modern space, crown molding is an easy way to add a timeless touch of sophistication. If you’ve been thinking about adding it to your home, I say go for it—you’ll love the difference it makes!
For an in-depth tutorial on crown molding check out this post: How To: Crown Molding!


Painting & Wallpaper Application
With the molding complete, it was time to paint! I always recommend painting first before applying wallpaper—this way, you don’t have to worry about accidentally getting paint on your beautiful new wallpaper. Once the walls were dry, I installed the peel-and-stick wallpaper, and wow—what a transformation


A Simple Trick for a Luxe, Spacious Bathroom
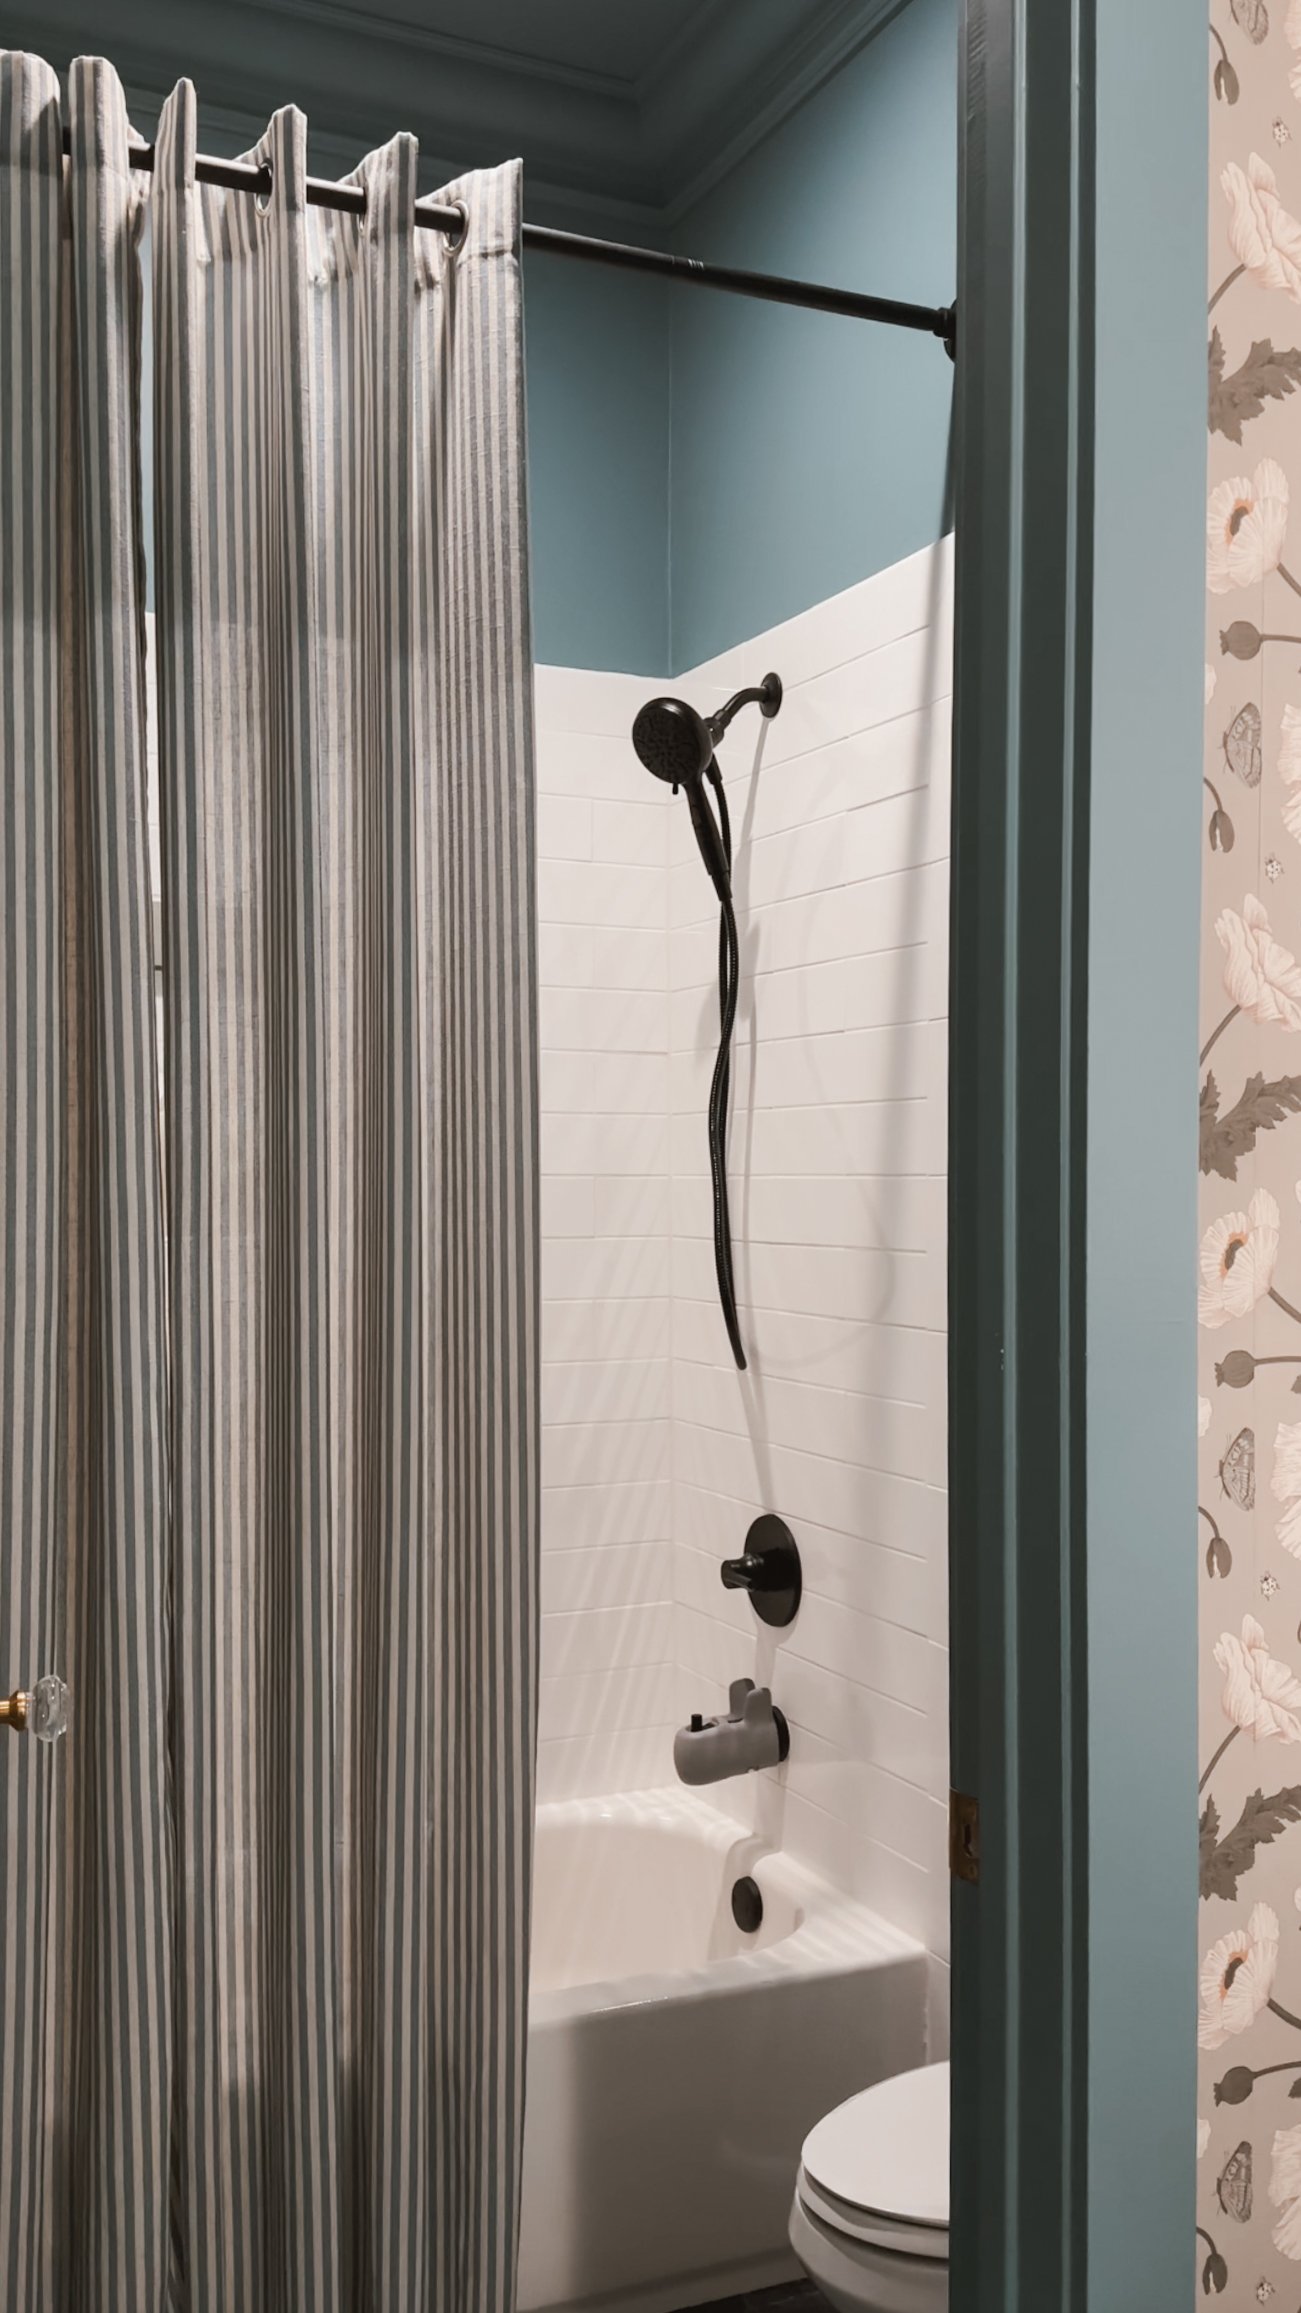
One of the biggest game-changers in making this bathroom feel larger was raising the shower curtain rod higher than the standard height. This simple yet effective trick draws the eye upward, creating the illusion of taller ceilings and a more spacious room. It’s amazing how such a small adjustment can completely transform the feel of a space!
To take it a step further, I decided to skip the traditional shower curtain and instead use a set of regular curtains from Amazon, layering them with an extra-long, no-hook shower liner behind them. Not only does this setup add height and drama, but it also gives the bathroom a more elegant, custom feel—almost like a luxe hotel or boutique spa. The added length and fuller drape of the curtains make the space feel intentional and polished rather than just functional.
If you’re looking for a simple way to elevate your bathroom’s design, I highly recommend trying this trick. It’s a budget-friendly upgrade that makes a big visual impact and instantly gives your bathroom a more refined, high-end look!

Amazon Favorites From This Makeover
I found a couple of standout Amazon vintage-inspired items that really helped pull this makeover together:


The Final Look
This bathroom started as a plain white box, and now it feels like a boutique hotel retreat! The combination of striking wallpaper, rich blue paint, elegant moldings, and thoughtful details created a space that feels both fresh and timeless. If you’re considering a bathroom refresh, don’t be afraid to go bold—a little color and pattern can completely change the vibe of your space!
What do you think of this transformation? Would you try a bold wallpaper in your bathroom? Let me know if you do!


Links at a glance
IF YOU ENJOYED THIS POST, YOU MIGHT BE INTERESTED IN my how TO: Crown MoUlding post.
FOLLOW ME ON MY SOCIALS!

How To: Crown Moulding
DIY Crown Moulding: Upgrade Your Space Like a Pro!
Looking to add a touch of elegance to your home? Installing your own crown moulding is a game-changer, and guess what? You can totally do it yourself! Let me walk you through the process so you can transform your space with confidence.
Step 1: Finding the Right Crown Moulding
I found this amazing brand called Orac Decor on Amazon a few years ago when we gave our bedroom a makeover (linked here). Back then, I hired someone for the job, but now I’ve installed this crown in my blue guest bathroom and my sunroom.
This crown moulding is made from high-density polyurethane foam, which means it's super lightweight and easy(ish) to work with.
Step 2: Plan Before You Buy
Order samples to see which design suits your space best. Hold them up against your ceiling to visualize the final look.
Measure your space carefully.
Add 15% extra to your measurement to account for mistakes and waste.
Once you’ve chosen your design and confirmed your measurements, place your order and get ready for install.


Step 3: Tools & Materials You’ll Need
Before you start, gather your tools and materials to make installation smoother:
🛠 Tools and Materials
Crown Moulding Pieces (I used Orac Decor Crown Moulding)
Adhesive (I used Orac Decor Adhesive by Outwater: Pro and Extra)
Baby Wipes


Step 4: Installation Time!
This video is my go-to because the creator explains measuring and installation SO well. Installing crown is a little complicated and writing it all out would be very wordy, so for a very detailed explanation, I HIGHLY recommending watching the video from Home RenoVision DIY. Note: I use a different adhesive than he does.
✅ Mark the studs using a stud finder. I use brad nails to hold the crown up while the adhesive dries so I pencil on the wall where my studs are so I know where to put in my brad nails.
✅ Measure twice, cut once. Seriously, this will save you a ton of frustration. Take your time to double-check your measurements before cutting.
✅ Practice first! Before making final cuts, use scrap pieces to get comfortable with the cutting angles.
✅ Cutting crown moulding is the biggest hurdle.You need to cut it upside down and backwards on the miter saw—this ensures it fits properly at the correct angle. If your crown isn’t too chunky, you can use a jig, but I’ve only been able to use a jig with the smaller crown I used in my sunroom. The crown in my bedroom and blue bathroom was too thick for the jig. Again, I highly recommend this video to learn cutting techniques.
✅ Apply the adhesive to all of the touch points. I recommend using the Orac Decor adhesive by Outwater—it’s designed specifically for polyurethane mouldings and creates a strong bond.
I use “Pro” to adhere the moulding pieces to the wall and “Extra” to connect the corners and edges of the moulding pieces together!
✅ Secure the crown to the wall with brad nails into the studs. These help hold the moulding in place while the adhesive dries.


Step 5: The Finishing Touches
This is where your project really shines! Take your time with these final steps:
Caulk the gaps to give a seamless finish. Run a thin bead of paintable caulk along the edges and smooth it out. I like using cheap baby wipes for this, but you can also use your finger and a damp paper towel.
Fill nail holes with wood filler, let it dry, then sand it smooth.
Paint your crown. Use a high-quality brush or sprayer for an even coat.


Step 6: Step Back & Admire Your Work!
And just like that—bada boom, bada bam—your space looks luxurious! 🎉 Crown moulding instantly elevates any room, giving it a refined, custom feel.
If you’ve been intimidated by crown moulding, I promise it’s doable. Take your time, be patient with the cuts, and enjoy the transformation. You got this—happy DIY-ing!

IF YOU ENJOYED THIS POST, YOU MIGHT BE INTERESTED IN my February best sellers post.
FOLLOW ME ON MY SOCIALS!

Wayfair Finds In My Home
Wayfair has been my go-to for home decor, helping define my home’s vintage-modern style.


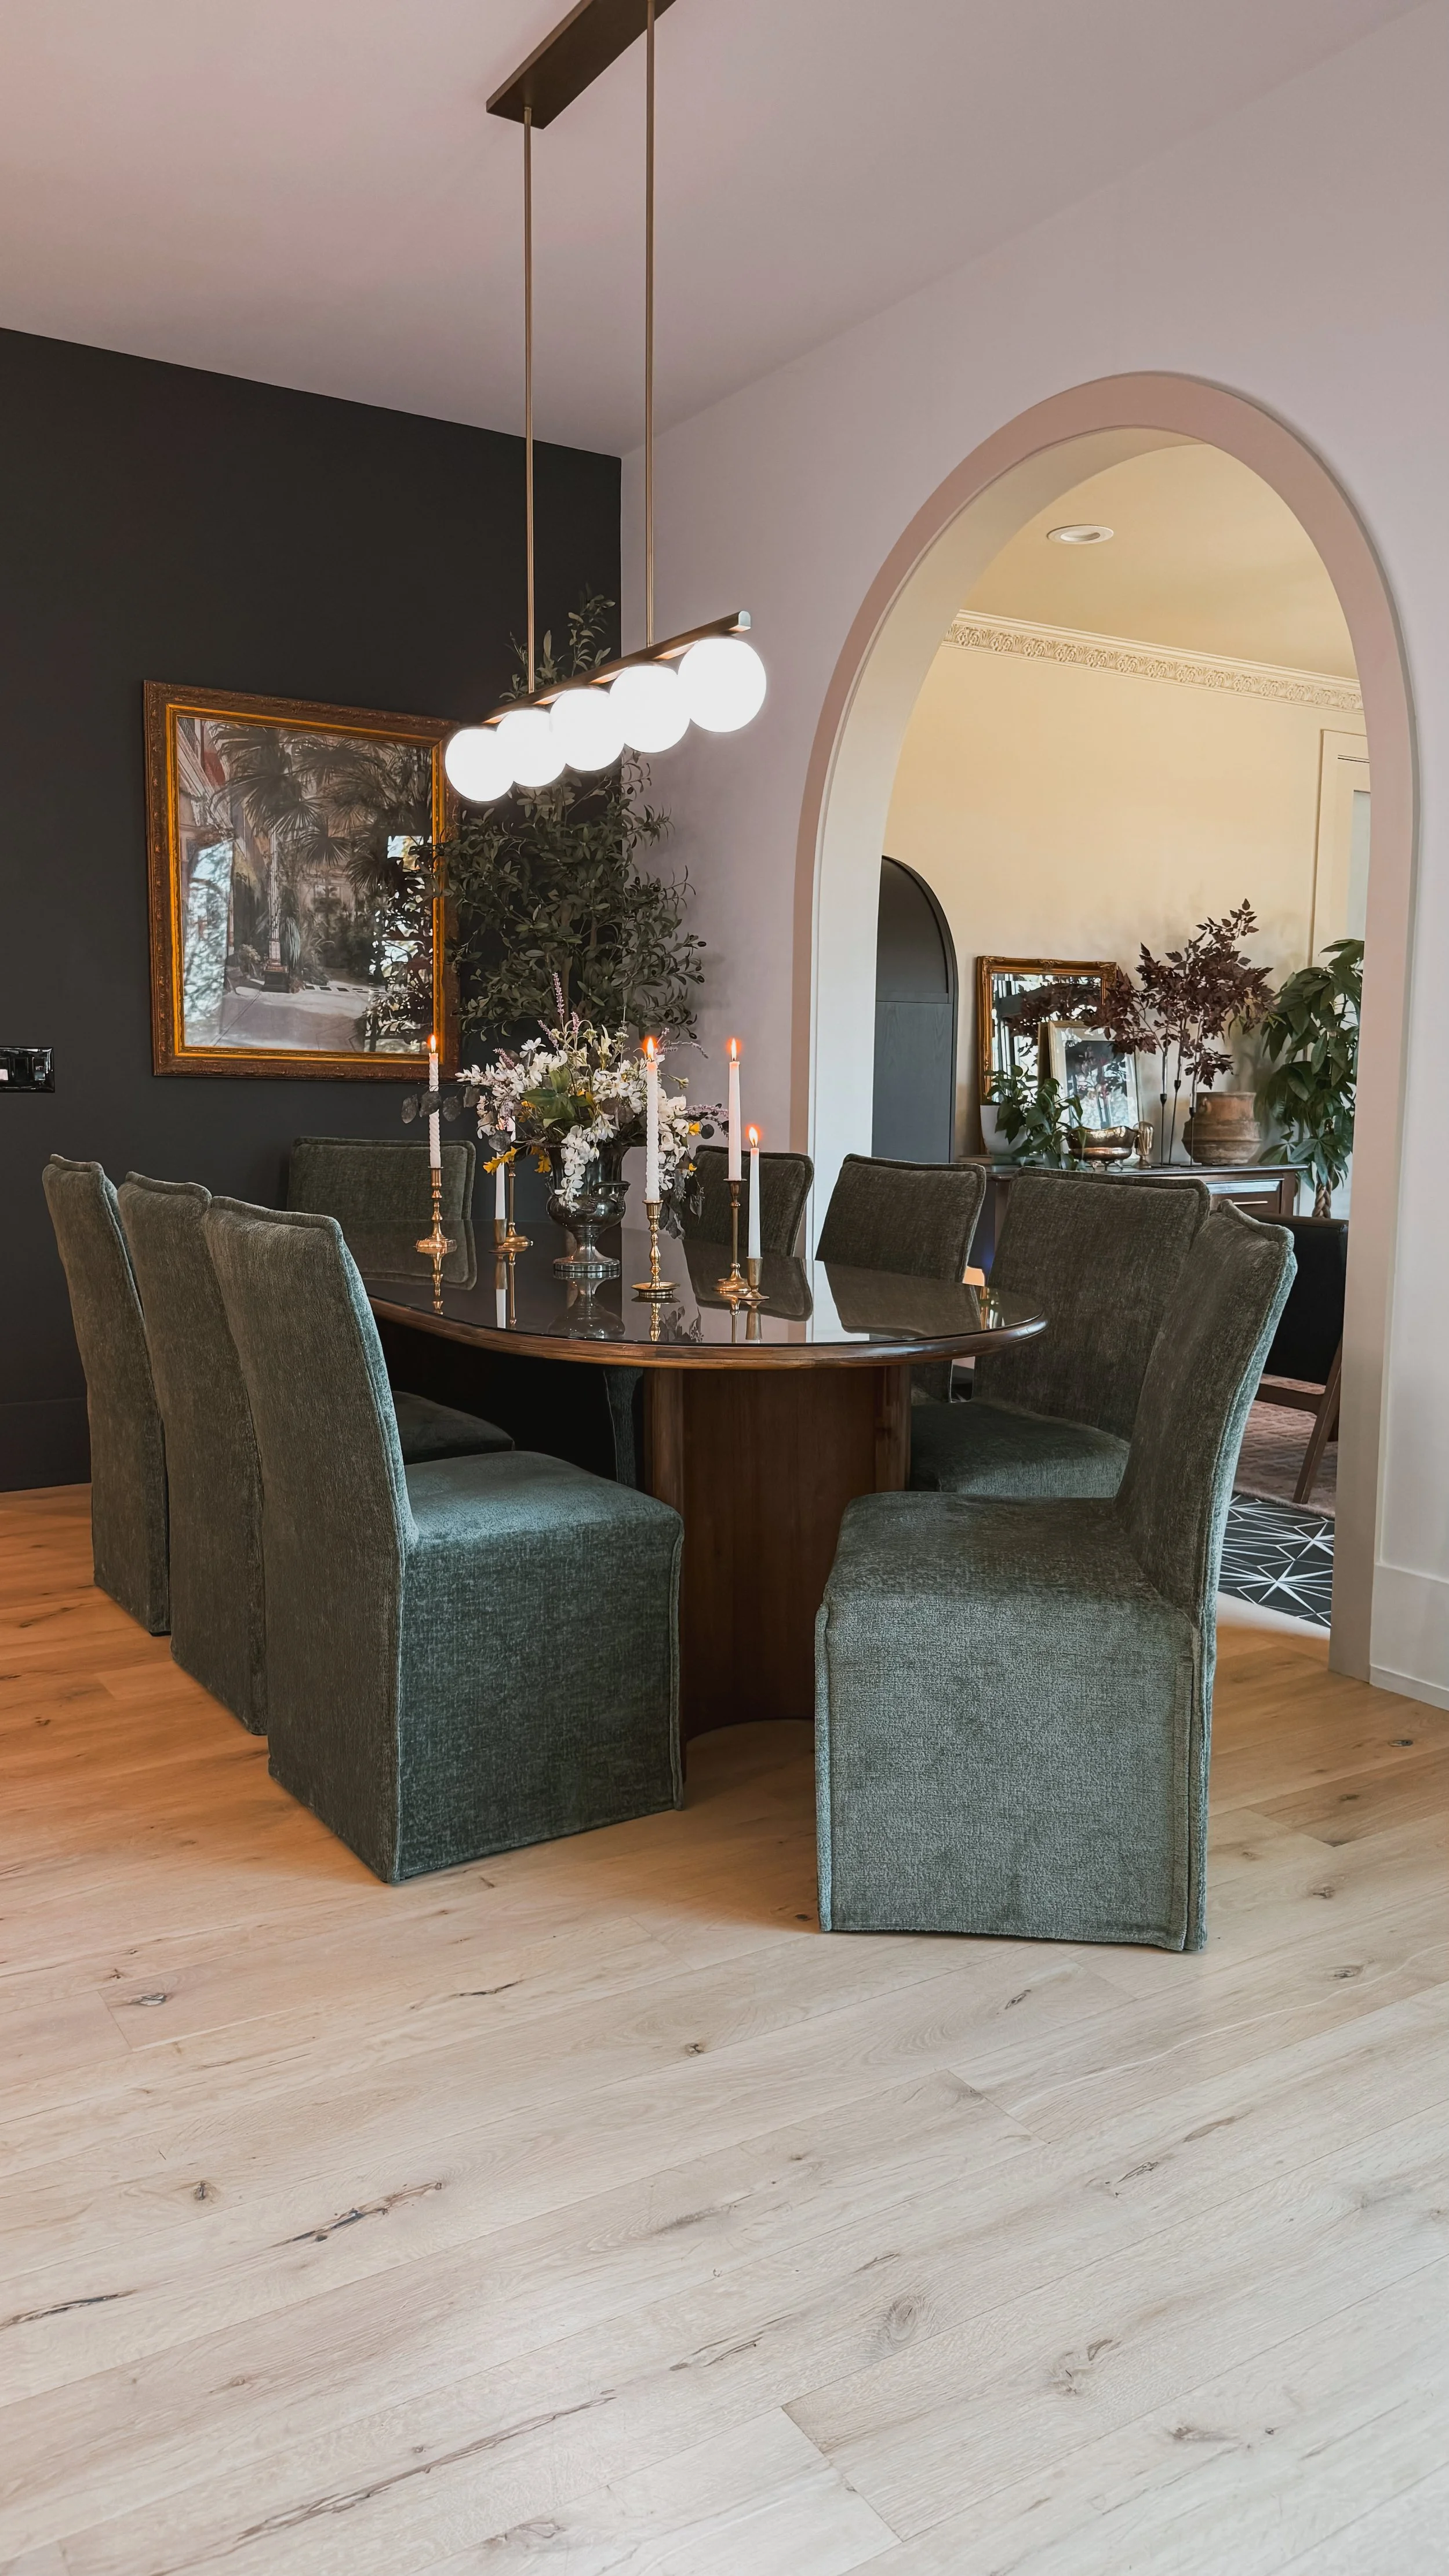
My favorite Wayfair additions include rust-colored swivel chairs in my moody green bedroom, along with solid brass doorknobs, light switch covers, a fireplace mantle, mirror, and white rug that tie the space together beautifully. In the dining room, I got a custom glass top made for my oval dining table, making it both durable and stylish.

My moody red bathroom makeover features toile-printed curtains used as a shower curtain (paired with a washable liner), a gold ornate mirror, a cabinet with sink attachment, and a wall sconce light. Small yet impactful details like the towel hook, brown blinds, double shower rod, gold faucet, and even a decorative toilet lever add character. Even my soap dispenser and wicker trash can are Wayfair finds!


My office features a diamond-patterned rug, while my living room boasts a stunning 4-foot sunburst wall mirror. These pieces bring warmth, sophistication, and personality to my home.


Wayfair has played a huge role in shaping my decor style, proving that the right finds—big or small—make all the difference!
LINKS AT A GLANCE
If you enjoyed this post, you might be interested in my oversized art post.
Follow me on my socials!

Let's talk periods. Yep - the topic you don't discuss.

This is a sponsored conversation written by me on behalf of Tampax/Always. The opinions and text are all mine.
I got mine in the summer of 6th grade. I was in another state visiting family for the whole summer when it hit. I remember being embarrassed trying to figure out how to get my mom to come to the bathroom without telling the entire house full of people what was going on. She gave me some gigantic pad that felt like a diaper and I spent the summer without my best friend which meant talking to no one about it. Later on I tried tampons, and I remember sitting in the bathroom reading the instructions as thorough as I could. Yeah, that little sheet of paper saved the day (after what felt like an hour of trying). Once I got used to them, tampons are what I stuck with. It's been my preference through beach days, workouts, and everyday life. It just so happens that Tampax is what I've used from the get go. Look, when my period hits I want to be as comfortable as possible and that means easy protection (that doesn't contain chlorine bleach or BPA - phew) and maybe a nap and definitely some chocolate. Oh, and best part of it alll - I went to a strict uniform wearing private school, and once you got your period, you were allowed to wear a purse which was a BIG deal for us eleven year olds. Oh heyyyyy!

If you need to stock up on Tampax tampons check out your local Sam's Club or samsclub.com to get $2 off in Instant Savings for a limited time. A big pack means you'll always be prepared for any surprises that might pop up, plus, you know you'll use them.
How was your experience? Did you also get to start wearing purses? haha!
